1994 Hunter Green SE “Back to Stock” Thread

Thinking more about the boot, I’m tempted to try something….since I’m locked in on Nutserts, I’m kind of thinking about buying some threaded studs in the nutsert thread, threading them in fully, then I could just slide the boot on. I could enlarge the boot screw holes where necessary, if necessary. I could use nuts and washers to hold the boot down.

Once the proper height was achieved, I could thread the studs down to that height, then use nuts on the underside of the nutserts as a jam nuts to hold the stud. This would make for an easily removable and reinstall-able setup. It’s a little bit fancy, but would give me a better solution than what I’m currently locked into.

Or I could just leave it alone, hope I never need to deal with it again, and when I inevitably do need to, deal with it at that point and maybe do the studs then…
 
  • Like
Reactions: DOWNS
Sounds like a good idea to me. I've got to go up a size on some of my self tappers at this point.
Yeah, that’s what I should have done all along….my YJ arrived to me with 4 of the 7 stripped. With carpet covering it up I didn’t care so much, but when I went bedliner, I could see the boot not fully held down in some spots which bothered me. I figured rivnuts would be the end all solution, but it only opened another can of worms. I should have used smaller than 1/4-20 first of all. Would be a lot easier to line it all up with smaller fasteners. But in reality I should have just stepped up the self tapper size.

Live and learn. I think I’m going to leave it alone for now since it’s held down good. I’ll do it with studs later if I have to go back in there. Maybe buy the parts now and hang onto them for that day.
Since the thread is 1/4 20, if you ever do go that route stainless acorn nuts on the top side would really dress it up. Just have to make sure that the studs aren’t too long. I know for a fact acorns come in 1/4 20 I have bought bags of 100 at Fastenall.
 
Since the thread is 1/4 20, if you ever do go that route stainless acorn nuts on the top side would really dress it up. Just have to make sure that the studs aren’t too long. I know for a fact acorns come in 1/4 20 I have bought bags of 100 at Fastenall.
Good idea! The carpet tucks in under the bottom lip of the outer boot but those would still work well I think. Might actually help hold the carpet up against the underside of the rubber too.
 
  • Like
Reactions: DOWNS and ytradio
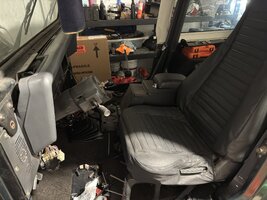
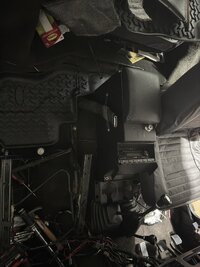
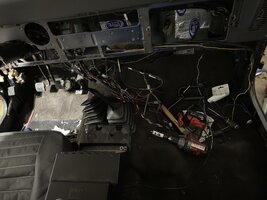
Been busy lately. Finally cleaned up the garage, which helps a lot. Through parts of December and January and a bit of February, I got most of the carpet installed. Lots of small cuts and lots of holes. At this time, the seats, console and shifters are all in.

IMG_3603.jpeg

IMG_3624.jpeg

IMG_3620.jpeg

Still need to work on the dash, I’m saving that for last. My axles are still undergoing surgery so I’d rather work on them than actual things on the Jeep for now.
 
  • Like
Reactions: DOWNS and Flyer58
Last I left off on the Dana 35 was that I received my larger 7/16” bolts which is what the factory upsized to somewhere around 2001 or so.

I started working on the setup, initially reusing the factory pinion shim of 0.041”. The shims provided in my spicer shim kit were only ranging from 0.041-0.046 in 0.001 increments, so they definitely don’t expect you to need to mess with pinion shim much.

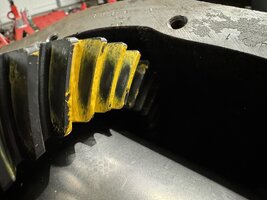
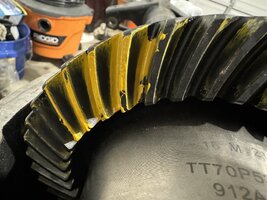
After running a bunch of patterns and different carrier shim sizes, I landed here:

IMG_3777.jpeg

IMG_3779.jpeg

I think this will run solid. I’m not a fan of the carrier shims I had to use though. The factory setup is just a thick shim per side (0.160-0.165ish), outside the bearing. This is ideal and super easy to deal with if you ever need to disassemble in the future.

Spicer’s intent for future setup service is to give you 2 0.150” master shims and then smaller ones to slip under the bearings. That’s all fine and good….if you’re using the stock carrier.

Eaton doesn’t make a perfect carrier. Or at least, it doesn’t match the specs of the Spicer carriers very well. I found that using either the stock 0.161 shim or the 0.150 service shim on the left (ring gear) side gave me no backlash at all. Jammed the ring gear too tight into the pinion. So I bought a Revolution Gear master kit. The shims in it were decent. I don’t like hammering in 6 small shims per side when installing the carrier but whatever, I don’t plan to go back in there for a long time.

I also found that the TT carrier was a bit smaller than stock. I installed it with the two stock shims and factory bearings and it slipped right in. No preload at all. So essentially during the setup I added more shim than stock and I packed a lot of that in the right side because the left side needed significantly less shim than stock in order to achieve any backlash at all.

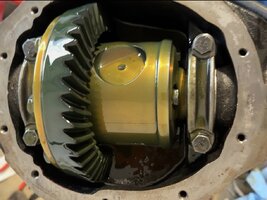
Finished the diff setup, installed new Spicer wheel bearings and seals, and greased the bearings a bit. Got the diff filled up with excess oil when it was in the stands and ran it with a drill for 5 minutes or so to lube everything up nicely.

IMG_3840.jpeg

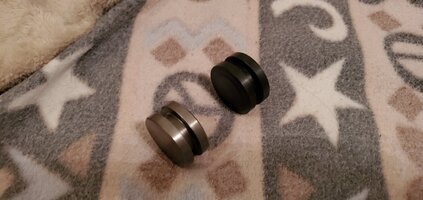
The final thing to deal with was the the c-clip spacer button. The one Eaton supplies is too small. It allows slop and then the axle shafts slide back and forth. Since it’s not like stock with a center pin keeping the left and right shafts in their respective areas, it makes for a lot of unwanted racket. It also can cause the driver to have to counter steer from the rear shifting around.

I found a guy on YouTube who had the same problem. He made himself a new spacer on a lathe out of chromoly and quenched it to make it hard. I reached out and he was willing to make me one as well for a very fair price. Went from 0.686 to 0.732 thickness. That took the slop from 0.058 down to 0.012. MUCH better. With gear lube there is almost no slop at all, and the little bit of clearance left will be good for the expansion of all the metals when they heat up. Definitely don’t want the button causing pressure on the axle shafts.

IMG_3879.jpeg

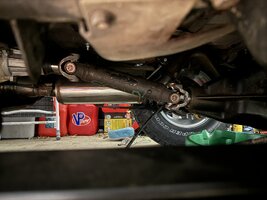
That’s about all for the Dana 35. I used a new 1310 yoke. I wanted to use a 1330 to “keep it 1994”, but the options weren’t good. I bought one from Denny’s (it’s a replica of the original since Spicer discontinued the original), and it was okay but it didn’t fit the pinion as snugly and when I spin it with a drill it seemed like it wasn’t symmetrical. I trusted the Spicer 1310 more, so I went with it.

Plus, 1330 is a longer yoke which means shorter driveshaft. It is hard to find a 94-95 driveshaft from eBay since they are only two years. So for used shafts, 1330 limited me. I found a good quality 1310 almost immediately. So I bought it and went with the 1310 yoke.

IMG_3866.jpeg

Still need to hook up parking brake cables, bleed the brakes and probably adjust the drums. But at least it’s in.
 
Last I left off on the Dana 35 was that I received my larger 7/16” bolts which is what the factory upsized to somewhere around 2001 or so.

I started working on the setup, initially reusing the factory pinion shim of 0.041”. The shims provided in my spicer shim kit were only ranging from 0.041-0.046 in 0.001 increments, so they definitely don’t expect you to need to mess with pinion shim much.

After running a bunch of patterns and different carrier shim sizes, I landed here:

View attachment 122664

View attachment 122665

I think this will run solid. I’m not a fan of the carrier shims I had to use though. The factory setup is just a thick shim per side (0.160-0.165ish), outside the bearing. This is ideal and super easy to deal with if you ever need to disassemble in the future.

Spicer’s intent for future setup service is to give you 2 0.150” master shims and then smaller ones to slip under the bearings. That’s all fine and good….if you’re using the stock carrier.

Eaton doesn’t make a perfect carrier. Or at least, it doesn’t match the specs of the Spicer carriers very well. I found that using either the stock 0.161 shim or the 0.150 service shim on the left (ring gear) side gave me no backlash at all. Jammed the ring gear too tight into the pinion. So I bought a Revolution Gear master kit. The shims in it were decent. I don’t like hammering in 6 small shims per side when installing the carrier but whatever, I don’t plan to go back in there for a long time.

I also found that the TT carrier was a bit smaller than stock. I installed it with the two stock shims and factory bearings and it slipped right in. No preload at all. So essentially during the setup I added more shim than stock and I packed a lot of that in the right side because the left side needed significantly less shim than stock in order to achieve any backlash at all.

Finished the diff setup, installed new Spicer wheel bearings and seals, and greased the bearings a bit. Got the diff filled up with excess oil when it was in the stands and ran it with a drill for 5 minutes or so to lube everything up nicely.

View attachment 122666

The final thing to deal with was the the c-clip spacer button. The one Eaton supplies is too small. It allows slop and then the axle shafts slide back and forth. Since it’s not like stock with a center pin keeping the left and right shafts in their respective areas, it makes for a lot of unwanted racket. It also can cause the driver to have to counter steer from the rear shifting around.

I found a guy on YouTube who had the same problem. He made himself a new spacer on a lathe out of chromoly and quenched it to make it hard. I reached out and he was willing to make me one as well for a very fair price. Went from 0.686 to 0.732 thickness. That took the slop from 0.058 down to 0.012. MUCH better. With gear lube there is almost no slop at all, and the little bit of clearance left will be good for the expansion of all the metals when they heat up. Definitely don’t want the button causing pressure on the axle shafts.

View attachment 122667

That’s about all for the Dana 35. I used a new 1310 yoke. I wanted to use a 1330 to “keep it 1994”, but the options weren’t good. I bought one from Denny’s (it’s a replica of the original since Spicer discontinued the original), and it was okay but it didn’t fit the pinion as snugly and when I spin it with a drill it seemed like it wasn’t symmetrical. I trusted the Spicer 1310 more, so I went with it.

Plus, 1330 is a longer yoke which means shorter driveshaft. It is hard to find a 94-95 driveshaft from eBay since they are only two years. So for used shafts, 1330 limited me. I found a good quality 1310 almost immediately. So I bought it and went with the 1310 yoke.

View attachment 122668

Still need to hook up parking brake cables, bleed the brakes and probably adjust the drums. But at least it’s in.
You won't have an issue with 1310s. My Wag only has 1310s throughout. The LS hasn't broken anything.
 
You won't have an issue with 1310s. My Wag only has 1310s throughout. The LS hasn't broken anything.
Yeah, definitely not worried about strength. I just wanted to keep it year correct; the 94-95 had 1330 on the rear pinion yoke. No clue why, it was totally unnecessary and random. They went back to 1310 on the TJ in early 96. The 94-95 thing was very strange.

Bad news though, I may be reevaluating my plans. Doing the finishing touches on the D30 this morning and working on the bearing preload, the grade 8 nut I was using shredded and killed the threads on both the nut and pinion. I really don’t want to buy another R&P and delve into yet more gear install work.

It’ll cost me more but I’m leaning towards finding a set of junkyard 4.11 axles and just refreshing with new bearings. I am beyond sick and tired of this phase of my jeep. I want the 4.56 I’ve been working to install, but I’m frankly tired of the work. If I were to hit the road after all that work and still have a problem with how I set them up, I think I’d light the jeep on fire.

Decisions decisions. Anybody got a 4.11 D30/35 set for sale? Ugh….

I literally may plug up the axle tubes with a thick wad of paper towels and plastic bags and button up the steering so I can drive the thing in 2WD. With axle shafts removed but stubs installed in the hubs. I’m tired of this thing sitting in the garage because of never ending projects.

IMG_3908.jpeg
 
Welp, decided I didn’t want to buy all the parts to do junkyard axles, so I went ahead and ordered another R&P. Hope this one goes better. I’m beyond ready to be done with axles.
 
Dang man. I hate when something stupid causes a setback like that. Yeah, halfway through mine, shortly after I had all the suspension work done, I took it on a short, midnight drive up and down my road. Didn't have tags yet, but just needed that motivation boost of seeing the light at the end of the tunnel and a reminder of what joy awaited once finished.
 
  • Like
Reactions: machoheadgames
Dang man. I hate when something stupid causes a setback like that. Yeah, halfway through mine, shortly after I had all the suspension work done, I took it on a short, midnight drive up and down my road. Didn't have tags yet, but just needed that motivation boost of seeing the light at the end of the tunnel and a reminder of what joy awaited once finished.
Yeah…oh well. While I’m waiting on more parts, I took some time to work on reassembling the dash some. Need a few parts for that too but I did make some nice progress at least.
 
Decided no more loud ish exhaust. Removed the Magnaflow and ordered up a Walker QuietFlow SS and a tail pipe. I need to drop the tank to replace the supply line from the pump to the sending unit (the one installed aftermarket and known to bust and leave you stranded), and you need exhaust out or the way for dropping the tank. So I figured since I need to do that, now was as good a time as any to go ahead and remove the exhaust so I can go back with something new and quiet.
 
I've been contemplating a full new exhaust and have seen that the Borla is a step up from stock in sound, but Magnaflow was quite a bit louder. I'd like something that lets the 4.0 sing a bit more at idle/part throttle, but isn't much louder over stock at cruise speed for comfort and tunes. My stock exhaust isn't even noticable above 40 mph. And anything over 50mph is all wind. I also don't want something that tries to make the I-6 attempt to sound like a V-8 or Ricey. I kinda like the Buzzy sound. From the sound clips on the tube, the Borla does seem to be what I'm after. That and the 304 stainless bit. Still in the very early planning phase and just brain storming.
 
I've been contemplating a full new exhaust and have seen that the Borla is a step up from stock in sound, but Magnaflow was quite a bit louder. I'd like something that lets the 4.0 sing a bit more at idle/part throttle, but isn't much louder over stock at cruise speed for comfort and tunes. My stock exhaust isn't even noticable above 40 mph. And anything over 50mph is all wind. I also don't want something that tries to make the I-6 attempt to sound like a V-8 or Ricey. I kinda like the Buzzy sound. From the sound clips on the tube, the Borla does seem to be what I'm after. That and the 304 stainless bit. Still in the very early planning phase and just brain storming.
I actually bought a Borla briefly from Summit Racing. The 14364 kit. It was very nice quality except for some reason it didn’t fit right. The muffler inlet tube is flared out so it can slip over the cat outlet. As such, when the flare ends is when the muffler bottoms out on the cat. At that point is where you’re done. For me, fully installed, the tail pipe was hitting the gas tank crossmember. Still not sure why...it was like my exhaust was too long. The cat was actually shorter than when I bought it new because I cut bits of the outlet pipe off multiple times, so theoretically with a brand new cat I would have had the same problem, only even worse. I'm still not sure what the deal is/was. I’m curious to see how the fitment of all this Walker stuff goes. Hopefully better than that.
 
Last edited:
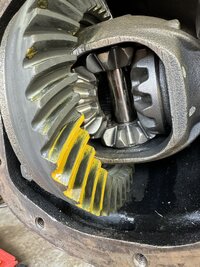
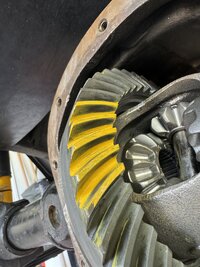
Well, I received the new 4.56 gear set for the front. I reused the same shims I had set the previous set with and seeped a bit shallow. Reshimmed it by adding 0.005” to the pinion depth. Ended up with my pattern here:

IMG_4004.jpeg
IMG_4005.jpeg

Shimmed the pinion bearings to about 13 in/lbs. It’s a bit light on the spec since the spec is more around 15-35, but 35 is quite high. 13 will be just fine and might actually last even longer.

Installed the left axle seal, the center axle bushing (plastic), and the CAD/right axle seal. Using the seal installer tool from Torque King 4x4 made it to where it could not have possibly been easier. With the bushing and the axle shafts all being new, hopefully I won’t have any leaks for a long time. The right side is notorious for leaking and usually happens after the outer shaft to inner shaft connection wears out which allows the shafts to wobble and kill the seal.

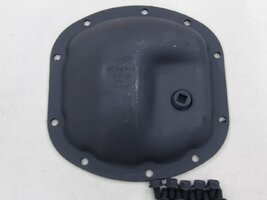
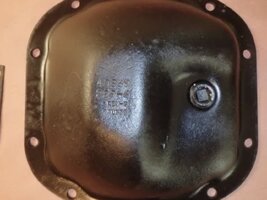
Waiting on a new used diff cover from eBay. The brand new ones I have bought from Dana and Yukon (even listed for high pinion D30) were not correct. They had the low pinion fill hole. Examples below:

Low pinion (wrong)

IMG_3966.jpeg

High pinion (correct)

IMG_3965.jpeg

So when I get that new cover, I can button it up and fill with oil. Already got the lubelocker gasket waiting for install.

Here’s what I can think of that’s left:

  • Bleed the brake master cylinder and then all the wheels, check for any leaks
  • Buy and install new parking brake cables for the D35 (old are pretty gnarly)
  • Reseal the transfer case case half (leaking)
  • Torque and install cotter pins on all steering components
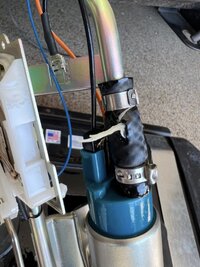
  • Drop fuel tank to change hose on sending unit (the one in there is known to burst and leave you stranded - dumb)
  • Reassemble the rest of the dash including heater box
  • Install battery tray and purchase and install new battery

I think that’s basically it. I need to clean the garage some more which I can now do a better job of with the front axle done. Can finally throw away a bunch of nasty paper towels.
 
  • Like
Reactions: DOWNS and ytradio
Several years back, during part of the super long project that started disassembly of my jeep which has not seen the road since before the start of, I installed an aftermarket tank. Mainly because I knew my stock tank slosh bucket was warped and figured an aftermarket tank was a better option.

The only company to make tanks is MTS company. Anything you buy from Crown, Omix, etc; it all comes from MTS. They do an all right job, but not great. First of all, the tank is taller than stock. They say it isn’t, and that the tank is modeled after the OEM part numbers 52002633 & 52018287. I believe this to be crap.

52002633 is known to be the 20 gallon tank for 87-90 2.5L and all 20 gallon 91-93s. 52018287 is the “20 gallon” tank for 94-95. I put that in quotes because 91-95 should be the same tank, just with the fuel pump cutoff sleeves in the fill and vent tubes to prevent higher fuel flow. Personally these numbers didn’t even seem to apply to my tank. My tank had 52020142 on it which doesn’t cross reference to anything at all. Definitely was a stock tank though.

Anyways, MTS says their tank models certain stock tanks and ONLY those and that it does NOT fit export models and that if it doesn’t fit your YJ tank as a replacement, then you must have an export. That is crap. The part numbers they said theirs matched also lined up with some export part numbers. Anyways, lots of reviews saying the tank was taller. So that’s problem number one.

The fix for the taller tank is to use the Warrior products skid plate, which ends up fitting the tank properly. The Warrior skid plate is deeper. The problem with the Warrior skid plate is that it’s slots for the tank straps position the tank further to the right side of the vehicle, making the fuel hoses not reach if you have a body lift. And even without a body lift, it’s pretty far away.

Lastly, the tank barely had a slosh sump in it. It had a little square area made by some molded ridges forming a border but that’s it. Very shallow. I didn’t like that, so I decided to go back to the stock tank.

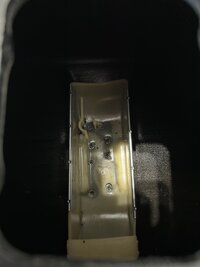
Like everyone else, my stock tank slosh bucket was bowed out. Mine was not bowed in a way that affected the fuel sending unit, but I didn’t like that it was bowed. So I took @Flyer58 excellent fix and applied that to mine.

Here are his threads:

15-20 Gallon Fuel Tank Slosh Box Warped

Fuel Tank Issues and Fixes

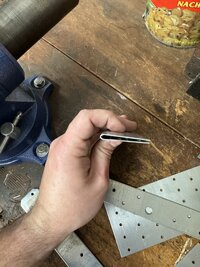
I did what he did which was to use a piece of galvanized Simpson Tie-Plate. I used TP37’s, which are 3-1/8” x 7”. Folded them over long ways using a vise and a piece of thin plate to help from mashing the tie plate too tight to fit onto the slosh bucket.

30 minutes later I had two of them and slipped them on. I initially did this by hand with TP35 (3-1/8” x 5”) but didn’t feel they were long enough and I didn’t didn’t do a great job bending them. The vise worked much better.

IMG_4267.jpeg

Fixed!

IMG_4269.jpeg

After fixing that I installed the pump/sending unit. I am using a Bosch 69544 pump and installed it onto an MTS fuel sending unit. I still have the original pump and sending unit that still work. I will be saving those “just in case.”

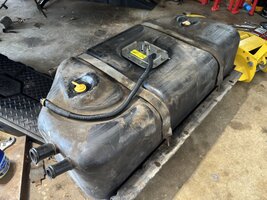
I used a new fuel tank mat between the tank and the old skid, and also cleaned up the vent valves and put new grommets on the valves. The valves themselves seemed fine so I reused. Not much to go bad in them, and they should work fine as long as they aren’t broken or cracked, which mine weren’t.

IMG_4272.jpeg

Tank is back in. Need to hook up the fill/vent hoses. I’m going to leave them loose because I have a body lift incoming to make more breathing room for the 30’s.

It feels good to know I have a new pump, fixed tank, and should be good to go. In doing this project this was to solve the problem mentioned above about the hose on the sending unit bursting.

IMG_4273.jpeg

I switched to the hose supplied with the Bosch pump so hopefully no issues there.
 
Looks great! I'm glad it worked out for you. Now I think I'll follow your lead and get a new Bosch pump and MTS sending unit. Mine still look original and float and sending coil are very worn. Did you cut a hole in the back floor for easy access to the pump? I'm still undecided on that mod.
 
  • Like
Reactions: machoheadgames
Thanks, hope it all works well.

I have not cut a hole. I thought about it, but I just can’t justify doing that to my tub when dropping the tank is as easy as it is. Obviously it’s a pain if you get stranded and need to deal with the tank, but hopefully using good parts prevents the need to deal with any of that.
 
Think what’s next is going to be new parking brake cables and wheel cylinders. Then I can finally finish up the last of the brake line hookups, bleed the MC, and bleed the wheels. And of course adjust the parking brake after that.

Still need to open up the tcase again to reseal the case halves, which I’m sorta dreading but it shouldn’t be too bad really.

The dash is about ready to go back together but the parts are all mismatched in color. Not too pleased about that. I want to paint them but don’t want to deal with it for now.