I've bought a bit of MTS stuff. A fuel tank for my CJ2A and some various HVAC bits and pieces for my 76 CJ5. The parts worked but they weren't exact to factory by any means. The CJ2A tank was a gimme as the original was steel and this was their poly tank, but the HVAC pieces were close but not quite there.
You are using an out of date browser. It may not display this or other websites correctly.
You should upgrade or use an alternative browser.
You should upgrade or use an alternative browser.
1994 Hunter Green SE “Back to Stock” Thread
- Thread starter machoheadgames
- Start date
Yeah, I'd say the quality of the parts is "okay"....they work. They definitely aren't as good of a fit as stock though. You'd think if they're going to make a tank to fit in place of a stock YJ tank, it would be a lot closer than it is. It doesn't help that the YJ came a few different ways from the factory over the years which makes it harder to replicate all of the different YJ configurations. Plastic tank, metal 14 gallon tank, brushed motor pump in 91-93ish, smaller brushless motor pump in 93ish-95, etc.I've bought a bit of MTS stuff. A fuel tank for my CJ2A and some various HVAC bits and pieces for my 76 CJ5. The parts worked but they weren't exact to factory by any means. The CJ2A tank was a gimme as the original was steel and this was their poly tank, but the HVAC pieces were close but not quite there.
My biggest complaints were the lack of a true slosh bucket, the tank being taller and not fittinig factory skid properly, and the skid that makes it all work places the tank an inch or two further to the right making the reach of the hoses a problem. Other than that, the tank definitely will do the job of holding fuel and being taller than stock, it might actually hold more than stock which would have been nice.
@machoheadgames I saw this photo on your old build thread; where did you get a new OEM leather steering wheel? My spice leather is pretty worn, and I thought I’d have to go to a custom upholstery shop.

I bought it off of eBay. I think it’s just an old stock one in really good shape. If I recall, it was one of the nicest on eBay….didn’t see any others that seemed as good of shape. So it might be difficult to find a good one. An upholstery shop might be a better idea.@machoheadgames I saw this photo on your old build thread; where did you get a new OEM leather steering wheel? My spice leather is pretty worn, and I thought I’d have to go to a custom upholstery shop.
View attachment 122745
I found this place in north Texas. Looks like they do good work and specialize it steering wheels. It’s easy to ship a wheel, so Ill have to get a quote.

 craftcustoms.com

Jeep Wrangler Cherokee CJ Steering Wheel Repair
Jeep – Steering Wheel Cover & Dash Trim Repairs “You’re going to love what you get … we guarantee it!” HOW TO ORDER GET PRICING REVIEWS FAQ Send us your Jeep Steering Wheel and Dash Trim Panels … And then we’ll refinish and restore them! 1984-1994 Jeep Cherokee XJ Leather Steering Wheel Restored...
 craftcustoms.com
Oh nice, that's right in the town where I work. If you end up doing that, it would be good to hear how it went and holds up long term. Hopefully mine holds up a while but would be good to have a backup plan.I found this place in north Texas. Looks like they do good work and specialize it steering wheels. It’s easy to ship a wheel, so Ill have to get a quote.

Jeep Wrangler Cherokee CJ Steering Wheel Repair
Jeep – Steering Wheel Cover & Dash Trim Repairs “You’re going to love what you get … we guarantee it!” HOW TO ORDER GET PRICING REVIEWS FAQ Send us your Jeep Steering Wheel and Dash Trim Panels … And then we’ll refinish and restore them! 1984-1994 Jeep Cherokee XJ Leather Steering Wheel Restored...craftcustoms.com
Oh damn Rockwall is about 30 mins from me. I may need to swing by. My second 95 XJ wheel is coming apart. They were only put in Xjs for 95 and 96 model year and the spare parts train for that specific part is dried up.
There are a ton of steering wheel photos on their site so it appears they have experience. Judging from the pictures, the work looks very good; maybe not OEM factory-good, but close.
The quote is $399. Pretty steep, but eventually I’ll probably have to do it. And if it lasts 15 years it’s worth it
If either of you two decide to go through with it, I’d love to see the results. Although I think you both have spice dashes? Mine is the 92-95 darker gray. Turns out my wheel from eBay is the earlier model, or if it’s 92-95 it’s a very light shade of it. It has the horn button without the little decorative rivet things, so I thought it was later model, but it's definitely lighter than my dash and steering column. Oh well, I can run it in the meantime and maybe perfect the color later. The dash needs to be repainted anyways, maybe I'll just have it match the wheel.
Black dash in mine, the factory seats and belts were grey. The steeringwheel is missing it's cover so I assume it was grey or black.
On my XJ the interior is tan and the steering wheel is black. IIRC when I scrounged up my NOS 95 XJ wheel it was around 300.
On my XJ the interior is tan and the steering wheel is black. IIRC when I scrounged up my NOS 95 XJ wheel it was around 300.
Odd. Looking at the parts manuals, black as a dash option is really only ever found in the early models, like 87-90. I only ever see spice and agate for 91-95ish and the parts manual tends to agree with that. Wonder how you ended up with black.Black dash in mine, the factory seats and belts were grey. The steeringwheel is missing it's cover so I assume it was grey or black.
On my XJ the interior is tan and the steering wheel is black. IIRC when I scrounged up my NOS 95 XJ wheel it was around 300.
As for the grays, they had a light gray in the early years and a much darker gray in the later years. I have the dark one, and my leather wheel appears to be the light one. Annoying, but I think I’ll focus on other things for the time being.
No idea. Given the amount of things painted on this Jeep, it's possible a previous owner painted the dash panel, but I haven't spotted any evidence for that. They could have swapped in a black panel.
Lots of random crap accomplished lately:
This afternoon hopefully I can get the rear pieces assembled and the driveshaft back in. Then skid plate can go back on.
Beyond that, all I really have left is:
- Fuel tank fixed and finally installed (had to remove and reinstall yet again - forgot the little push-on metal clip for the sock to hold it onto the pump)
- New cat/muffler/tailpipe installed - pipe is super close to tub but I think I have enough clearance to not rattle
- Rear shocks finally installed
- Brake master cylinder bled and wheel brakes gravity bled (will do a more thorough 2-man bleed when it's drivable)
- Body mounts torqued. Decided to not install a body lift
This afternoon hopefully I can get the rear pieces assembled and the driveshaft back in. Then skid plate can go back on.
Beyond that, all I really have left is:
- Rewire CAD electrical plug
- Install dash and heater/heater controls
- new battery
- Fasten the windshield and hardtop
- 2-man brake bleed
- Coolant flush
Wrapped up the t-case and got it filled tonight. Driveshaft back in, skid plate back on. Seems to not be leaking anymore, so I think I nailed that.
I think that officially does it for work underneath. I’ll need to do the final brake bleed once it’s time to hit the road, otherwise I think I’m done down underneath.
Trying to find my parts I previously bought for the CAD plug. The old factory YJ CAD switches have a pigtail on them. You can’t find that switch at all anymore. There is a Dodge version with no pigtail that I plan to use. Problem is, I wanted an old YJ switch that I could neuter to keep the stock wiring. I just can’t find where I put those parts.
While I sort that out, I’m probably going to work on the finishing dash installation for now. Not like the CAD switch is that important anyways. Just want to keep it as close to factory as I can.
Got a bit more done this week/weekend. The heater box went in a few nights ago. It’s not hooked up yet, but I did get the vent cable hooked up (you have to hook it up or else you can’t get to it once the box is installed because of too little room up against the tub wall).
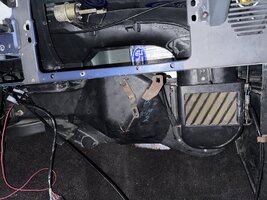
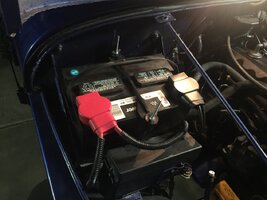
Getting the heater box installed and the nuts tightened down to hold it to the firewall means that the engine compartment side was able to have some work done as well. Battery tray went back in, as did the PDC tray that fixes to the battery tray. I temporarily installed the old battery which is definitely way dead by now, even fully charged, it holds a charge for about a day at most. New battery definitely coming soon, but I threw this one in for some battery cable mockup.
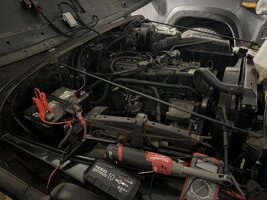
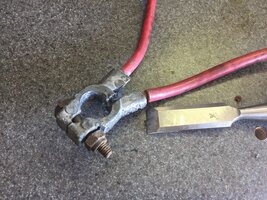
I did my own custom cables years ago, and I never liked them. I went bigger than stock, which is bulky. I went with welding cable, which is good but super flexy and hard to control. The whole thing was unnecessary, except for the military terminal style that I upgraded to. So, at this point I am going to mess with it again. I ordered a factory harness from eBay that seemed to be in good shape. I am going to do what I should have done years ago, which is to cut off the factory battery terminals and terminate the stock cables to the ring terminal lugs so I can hook them up to my military terminals. This will be the best of both worlds: stock cables that fit like stock (loomed and follow nice factory path), but also are terminated with much better ends and to terminals that allow for customization and add ons.
This is what my buddy did with his YJ years ago, and it turned out super clean:
I also added a Bussman 5-relay block years ago, which needs a power and ground hookup. My purpose for that box has changed a few times, but the final purpose for it is to provide clean power to my JW Speaker LED headlights which actually pull a decent amount of amps together, somewhere around 10A.
Initially, made my own custom cables for the Bussman as well, out of some 8Ga SGX cable. Worked fine, but I was never a fan of a few aspects of that install. The power was not fused, and the ground was ran all the way to the battery which is unnecessary and adds battery bulk. So today, I shortened the ground and reterminated it to the firewall ground stud. The power remains the same, but I am working on a solution to cleanly hook it up with a fuse. I know the starting circuit and the cable going to the PDC are not fused, however I definitely feel better adding a fuse to my own cable for the Bussman.
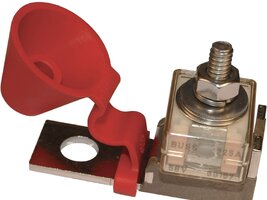
So my plan for that, is to use a Blue Sea MRBF (main relay battery fuse) which works well for a simple hookup of an added battery style cable. The problem is, these are horizontally designed which means when I mount it to a horizontal bolt on the battery terminal, it will stick up vertically. I was thinking I could maybe bend it 90°, but the terminal would then hang over other stuff. Not the end of the world, but then I found these neat military terminal adapters that add a vertical post:
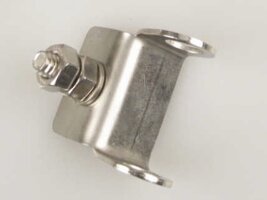
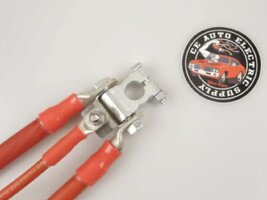
Here is the MRBF I want to use, it should work well now that with this adapter, I’ll have a vertical stud to mount to:
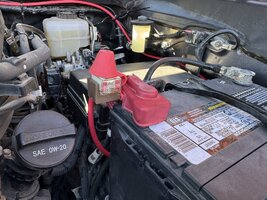
Here is a photo of the MRBF in my Tacoma as an example…super clean. The red cable in the background was not permanently installed at the time lol, it is loomed and looks factory now.
I’ll post more photos of the final results when it’s done. Waiting on parts for now, I need to order some new military terminals, new ring terminal lugs, and I ordered the stock harness I’m going to use.
Under the hood is just about done! Only other engine compartment stuff I need to work on is the wiring for CAD indicator switch.
Probably will work on the rest of the dash some this week while I wait on the battery stuff. Mostly hooking up the heater, running the harness and plugging things back in, then the dreaded glove box reinstall. Windshield after that.
I promise I’m not lazy…when I’m not working on the YJ, I’m usually tinkering with the Toyota. Rarely repairs, but definitely add ons or maintenance. And some minor repairs. This weekend, coolant and spark plugs.
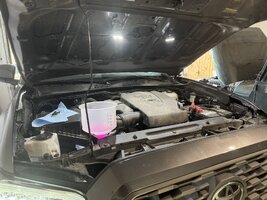

Getting the heater box installed and the nuts tightened down to hold it to the firewall means that the engine compartment side was able to have some work done as well. Battery tray went back in, as did the PDC tray that fixes to the battery tray. I temporarily installed the old battery which is definitely way dead by now, even fully charged, it holds a charge for about a day at most. New battery definitely coming soon, but I threw this one in for some battery cable mockup.

I did my own custom cables years ago, and I never liked them. I went bigger than stock, which is bulky. I went with welding cable, which is good but super flexy and hard to control. The whole thing was unnecessary, except for the military terminal style that I upgraded to. So, at this point I am going to mess with it again. I ordered a factory harness from eBay that seemed to be in good shape. I am going to do what I should have done years ago, which is to cut off the factory battery terminals and terminate the stock cables to the ring terminal lugs so I can hook them up to my military terminals. This will be the best of both worlds: stock cables that fit like stock (loomed and follow nice factory path), but also are terminated with much better ends and to terminals that allow for customization and add ons.
This is what my buddy did with his YJ years ago, and it turned out super clean:


I also added a Bussman 5-relay block years ago, which needs a power and ground hookup. My purpose for that box has changed a few times, but the final purpose for it is to provide clean power to my JW Speaker LED headlights which actually pull a decent amount of amps together, somewhere around 10A.
Initially, made my own custom cables for the Bussman as well, out of some 8Ga SGX cable. Worked fine, but I was never a fan of a few aspects of that install. The power was not fused, and the ground was ran all the way to the battery which is unnecessary and adds battery bulk. So today, I shortened the ground and reterminated it to the firewall ground stud. The power remains the same, but I am working on a solution to cleanly hook it up with a fuse. I know the starting circuit and the cable going to the PDC are not fused, however I definitely feel better adding a fuse to my own cable for the Bussman.
So my plan for that, is to use a Blue Sea MRBF (main relay battery fuse) which works well for a simple hookup of an added battery style cable. The problem is, these are horizontally designed which means when I mount it to a horizontal bolt on the battery terminal, it will stick up vertically. I was thinking I could maybe bend it 90°, but the terminal would then hang over other stuff. Not the end of the world, but then I found these neat military terminal adapters that add a vertical post:


Here is the MRBF I want to use, it should work well now that with this adapter, I’ll have a vertical stud to mount to:

Here is a photo of the MRBF in my Tacoma as an example…super clean. The red cable in the background was not permanently installed at the time lol, it is loomed and looks factory now.

I’ll post more photos of the final results when it’s done. Waiting on parts for now, I need to order some new military terminals, new ring terminal lugs, and I ordered the stock harness I’m going to use.
Under the hood is just about done! Only other engine compartment stuff I need to work on is the wiring for CAD indicator switch.
Probably will work on the rest of the dash some this week while I wait on the battery stuff. Mostly hooking up the heater, running the harness and plugging things back in, then the dreaded glove box reinstall. Windshield after that.
I promise I’m not lazy…when I’m not working on the YJ, I’m usually tinkering with the Toyota. Rarely repairs, but definitely add ons or maintenance. And some minor repairs. This weekend, coolant and spark plugs.

Last edited:
Well, I received the eBay stock battery harness today. Of course, it’s in worse shape than I expected. Kind of figured this is how it would be, but the photos seemed to do it justice. Oh well.
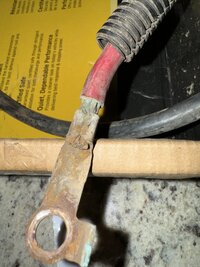
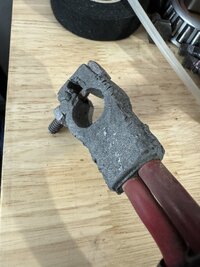
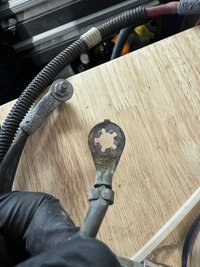
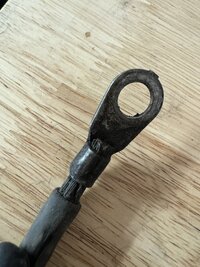
I think since I have this harness to go off of, I’m going to use it as a guide to build my own “stock” harness. I’ll use the same gauge as stock, same loom sizes and clamp placement, and keep the lengths the same. Only difference will be the military terminal hookups instead of the non customizable stock style battery hookups. Little bit more expensive and a pain, but at least it’ll fit like stock and yet be all new.
The only thing I don’t like is I can’t find a terminal with the anti rotation tab like the starter connector has in the photo. But that’s not a big deal, it’s just one of those “nice touch” type of things the factory does that I wish I could mimic.
I did play around with the terminals and such I received a day or two ago and I think I’ve got a permanent setup for the fused relay box hook up, so that’s nice at least.
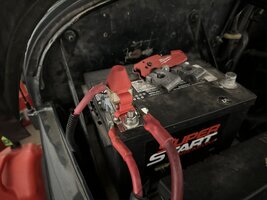

That's what I did, though I started with an already intact harness. Took it down to my local Orileys and one of the more helpful counter guys spent 20 mins with me getting the materials together and building all the battery cables from scratch. Think it was about 60 bucks total.Well, I received the eBay stock battery harness today. Of course, it’s in worse shape than I expected. Kind of figured this is how it would be, but the photos seemed to do it justice. Oh well.
View attachment 123004View attachment 123005View attachment 123006View attachment 123007
I think since I have this harness to go off of, I’m going to use it as a guide to build my own “stock” harness. I’ll use the same gauge as stock, same loom sizes and clamp placement, and keep the lengths the same. Only difference will be the military terminal hookups instead of the non customizable stock style battery hookups. Little bit more expensive and a pain, but at least it’ll fit like stock and yet be all new.
The only thing I don’t like is I can’t find a terminal with the anti rotation tab like the starter connector has in the photo. But that’s not a big deal, it’s just one of those “nice touch” type of things the factory does that I wish I could mimic.
I did play around with the terminals and such I received a day or two ago and I think I’ve got a permanent setup for the fused relay box hook up, so that’s nice at least.
View attachment 123008

