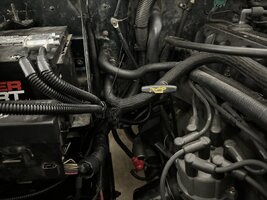
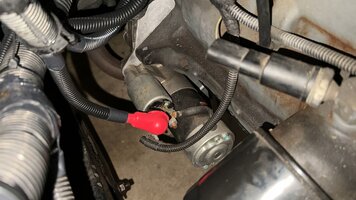
1994 Hunter Green SE “Back to Stock” Thread

That's what I did, though I started with an already intact harness. Took it down to my local Orileys and one of the more helpful counter guys spent 20 mins with me getting the materials together and building all the battery cables from scratch. Think it was about 60 bucks total.
Yeah, I ended up finding some 4Ga welding wire (red and black) long enough to do the 3 cables I need to do. Forgot I bought those 3-4 years ago because I already didn’t like the thicker cables I made before then and wanted to change them out. The stock cables are 4 gauge to starter, 4 gauge to engine block ground, and 8 gauge to the firewall ground, so I guess the firewall will get an “upgrade.” They all still fit in the small section of loom at the battery tray so it’ll work.

I need 2 more ring terminal lugs in 4 gauge (for the two grounds) and then I can terminate and hook them up. I have all the parts for everything else and I’ll cover it all in loom and a bit of tape when I’m closer to done. I’ll share how it turned out when done. It will basically be identical to stock except for being welding wire, that one upsized wire, extra loom vs stock, extra tape vs stock, and military terminals instead of stock.
 
  • Like
Reactions: DOWNS and ytradio
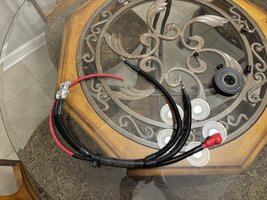
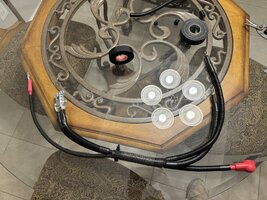
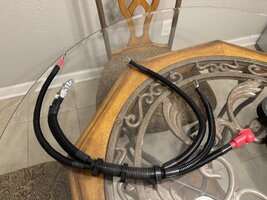
Battery cables are done. The lugs came in this evening and so that was today’s project.

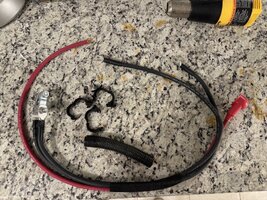
I basically taped a power and two grounds together, snipped them at the rough locations, then fine tuned those by mocking it up in the Jeep multiple times and following the factory routing to see where things landed. Take photos of the lug on the cable loosely, then remove it and crimp it in the right orientation. Tedious, but not hard at all.

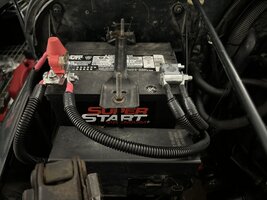
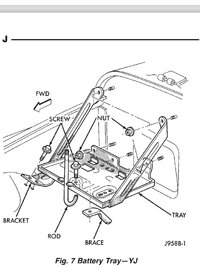
I reused the factory loom and clamps for the battery tray. This will hold the harness snug and also served to help make sure I cut things to the right length.

I taped the bundle in the middle to keep things from shifting, and then I taped every individual cable just to add some extra puncture/cut resistance. Lastly, threw on some 7/16” ID split loom and taped the ends with polyken tape.

Now I just need to finish up the dash, get a battery, do a coolant burp and hit the road.

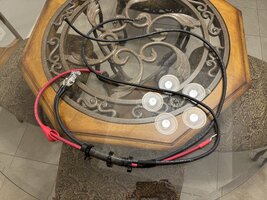
Cables tied together and lengths approximate. Starter boot slid on from the battery end since the other end was crimped and too large for the boot to go over:

IMG_4670.jpeg

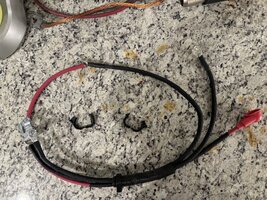
The bundle taped in the middle and boot in proper spot:
IMG_4673.jpeg

Taping done on the grounds and the starter end of the positive:
IMG_4674.jpeg

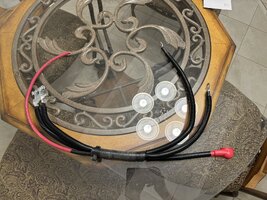
Center loom added at the bundle and separate looms added at all the individual wires:
IMG_4675.jpeg

Loom ends all taped with Polyken
IMG_4676.jpeg

Positive battery end taped:
IMG_4677.jpeg

Positive battery loomed and ends taped:
IMG_4679.jpeg

Installed:
IMG_4731.jpeg
IMG_4732.jpeg
IMG_4690.jpeg
 
Last edited:
Nice work. Looks factory but better. I like your attention to detail on the wiring, I try to do the same. My last YJ had so many freaking wire nuts all through the harness, it was ridiculous.
Hah, I hate to admit it, but I may have used wire nuts on the stereo adapter harness 11 years ago…I figured if Crutchfield sold them, they had to be okay right? Even as a complete and total newb who didn’t know better, it felt totally wrong. But I had 0 wiring tools nor know how so I didn’t know what else to do…and I really wanted that aftermarket stereo in. So I went on with them. They did end up working fine until I yanked them for a crimped solution a few years later.

Thanks for the kind words. I find my biggest motivation for good work is seeing the crap I’ve done in the past and wanting to improve what I don’t like about it. My last battery cables weren’t even crap as far as functioning as a cable, but I just really didn’t like the way they turned out. Remove them from the battery and they’d fall down into the under-battery area. If not zip tied, they’d flop around. They were heavy, and being thicker they were hard to route. It just wasn’t ideal and stuff like that really pushes me to fix all the complaints I have when I revisit it in round 2. So to follow the theme of the thread, once again I ended up following the stock design, lol.

The part I hate about wiring is it seems like every time I dive into a project, I’m missing a bunch of random stuff that nickels and dimes me to death. Every wiring project turns expensive. I have also learned that everything looks pretty when covered with enough tape and loom.
 
Last edited:
Got a new battery a couple days ago. Needed this very badly - I tried to charge the old battery and all it did was get up to 11.5 V and then swell real bad and got super hot. I went with a Legend Professional from NAPA. Mother’s Day made it a tolerable price. I went with the stock Group 58, mainly because I just don’t have a need for more. 550 CCA is plenty for starting and I don’t even have a winch, but when I do get one I won’t be doing anything difficult, will probably barely use it.

I could have gone with a group 34 but they’re considerably taller and I had concerns about my fuse hookup touching the hood. Group 65 is shorter like stock but a lot longer, it barely fits between the trays side brackets and it makes fitment with the j-hooks a bit weird, so I decided I didn’t really have anything to improve and stuck with stock.

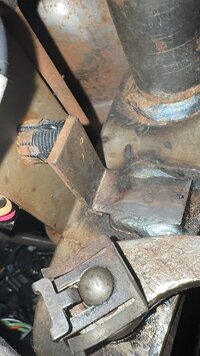
I did learn after 11 years that I’ve been doing the front j-hook all wrong. I think it was set up wrong when I got the jeep, as it got a new battery right before I bought it and I think it was installed wrong. The j-hook was always kicked to either side, grabbing one of the little location tabs that keeps the hook centered. I realized by feeling under the tray that there is a hole for the hook to go into, which ends up turning the hook straight rearward facing.

IMG_4801.jpeg

Anyways, battery was hooked up and immediately the brake lights came on. Turned out going back to stock on the brake booster needed the brake light switch adjusted a bit. So pushed that inward so that the tab on the pedal contacts the switch, seems to be good now.

IMG_4798.jpeg

Weird to be able to power things on again, it’s been so long. I should be firing it up pretty soon, hopefully this upcoming week. The weekend was busy and so I didn’t get much done. I think I’m going to swap the distributor and prime the engine oil again. And change the oil since it’s old.

The dash isn’t fully reassembled still (no time), but it doesn’t need to be to fire it up. Everything essential to starting is hooked back up.

I got some larger rosebud clip fasteners to secure the PDC loom up to the battery tray bracket again. Need to install those and then I should officially be “done” with underhood wiring until I add an amp for stereo later. Which I’ll just do by swapping the 1-fuse hookup to a 2-gang version.
 
  • Like
Reactions: DOWNS and ytradio
One piece at a time, getting there. It took me almost 8 months after I began tearing mine apart. One thing lead to another and it was torn down farther than I had originally planned. Didn't think I'd ever get it back on the road there for a while but some nights, I'd just go out and try to get one thing done when it was late or I was tired. Next thing I knew, it was time to start her up. I figured for sure after all the the parts I had replaced and changes I had made, I'd be chasing something but she fired right up on the first crank.

Hope you get it fired up soon.
 
  • Like
Reactions: machoheadgames
One thing lead to another and it was torn down farther than I had originally planned. Didn't think I'd ever get it back on the road there for a while
Exactly how it went for mine. In 2020, I started spending some money and started with a lift, nice bumper/tire carrier, needed to drop the gas tank for that, don't remember how but eventually the entire interior was torn apart and the transmission was out for a clutch and flywheel and oil pan off RMS/oil pan gasket job. Got it most of the way back together until I decided to do the stock thing which required further undoing part of what I had done leading up to that point and then I dug into the axles because I didn't want 4.88 on 30's.

Anyways, yeah I've done small item by small item for a while now and turns out I am just about ready to start. I am a bit concerned about the cooling system. The thing is probably pretty rusty inside, it sat with the cooling system open for a while with coolant drained. I'm sure that started some rust and it's never been full since, and definitely hasn't had actual coolant in it since 4 years ago. I really don't want to pull the engine like you did, I am just hoping flushes will get it good enough.

Mine also got ran without oil for a few minutes and probably several thousand rotations back in 2021. I'm still not sure what effect, if any, that had on the remaining longevity. I've been tempted to put in a used motor and just be done with worrying about it but I think I'm going to run it for now and do an oil sample with Blackstone.


At the current point in time, I pretty much need to change the oil, prime the engine oiling with the new oil, stab the newer 1995 distributor, fill the coolant (or flush stuff and water more like), and then I can start it. The rest to get it driving is all interior stuff and some final undoing and reterminating of some dash wiring I did several years back that I will no longer need because of changed plans.
 
  • Like
Reactions: DOWNS
I understand that, the previous owner ran tap water for coolant and wasn't big on doing maintenance. I flushed the hell out of it and then did it again when I pulled it and flushed the hell out of it some more. I hope with the coolant/distilled water that it will clean up the block. I saw a YT video of a guy with an XJ that had a similar problem. He showed video of the block after 10k miles or so using proper coolant and the block looked really good behind the water pump and thermostat. So I am hoping that will be the same for mine.

I purchased a reman from S&J engines about 3 years ago now, that was planned for my previous 91 YJ as it's engine was a wreck. I never got that far when I realized that Jeep wasn't worth anymore money or time. So the engine has been on the stand. When I found this Sahara it only had 61k and I wanted to save the existing 4.0. It seemed to run okay despite all the issues and I know the reputation these engines have for being tanks so I wanted to keep using it. Since the rebuild, it's been running well and I am just keeping the reman as my insurance policy. I have pulled engines from other vehicles but this one has to be one of the easiest to work on, especially after the fenders are removed.

Hopefully yours is good after it gets the love it needs. I plan to do a coolant flush in the next few months just to see how it's doing. Also planning an oil change soon to see how that looks. I used Valvoline VR1 since the rebuild.
Yeah, I saw how nasty yours was. I have never ran tap water, so I have that going for me. I'm hopeful that a healthy dose of thermocure and Prestone will do it to clean mine up.

The bigger thing for me is if my bearings/crank/cam/lifters incurred any damage by being run without oil. The lifters made some nasty tapping noises that went away once the oil was restored. Still not convinced some significant long term damage was done.

I ordered VR1 for mine as well, I went with 20W-50 for now just for a bit thicker but I may drop back to 10W-30 at some point. In the summer the thicker stuff will be fine. Just figured after the damage I might start with something a bit heavier for a thicker barrier, at least to get parts lubricated again. At least a Blackstone lab report after a thousand miles or so would tell me how the metal wear and such is doing since the lack of oil incident.

If I do notice any issues with the first few drives, I'll probably order up a used engine (got my eye on one currently), do the swap and call it done.
 
  • Like
Reactions: DOWNS
Pulled the distributor this evening. Nothing to report, I put the drill in the oil pump and it was pumping oil very quickly. Had I cranked the engine it would have been just fine. Of course, and had I not, I probably would have run dry again. Oh well, it was good anyways because I “upgraded” to a nice stock 1995 distributor in the process. Easier to change the CMP sensor if it ever goes bad on the later style (have to remove and fully disassemble the old (91-94) style to change the sensor)

Motor was already at TDC (exhaust stroke) so the distributor was pointing at #6. That was easy enough to follow so I didn’t turn the engine over at all. I don’t know why it was on TDC, I’m pretty sure the last time the engine was messed with was when I pulled the jeep back in the garage (had pulled it into the driveway briefly once I got the oil pumping again), but maybe I put it there at some point since and forgot why. Anyways, with it being easily on the #6, it was simple to remove and restab the dist without any guidance.

Oil is changed with a new Mopar filter.

I think at this point I am able to fill the coolant with some distilled water and crank it up. Maybe tomorrow afternoon.

Probably going to go to a shop for a pressurized coolant flush, I’d rather do that than a bunch of drive cycles with Prestone. Once I get it clean then im going to empty it all out completely and do a new thermostat, thermostat housing, water pump, and radiator. All Mopar.
 
Last edited:
Well I decided screw it, try to fire it up. It fired up, but it runs quite rough and stumbles immediately when you hit the gas.

Not sure why. I really don’t think I got the timing 180° out, because the last time I cranked it, it was a test run and I backed it into the driveway and then pulled it back in. I really don’t think I ever messed with the timing after that point, though it is very strange that I had the motor at TDC for #6 when I looked today.

My first suspicions are fuel related (new pump, old filter, old fuel in lines maybe), and the cam sensor in the new distributor. I would think if the sensor is bad, I’d be getting trouble starting and running completely, similar to a crank sensor.

I’ll probably rent a fuel test kit tomorrow and see how that looks. It ran long enough (for around a minute) that any old fuel should be replaced by the new stuff in the tank. I doubt it’s fuel related.

Maybe timing/spark related, I don’t know why it would be but anything is possible I guess. I am glad to see that it fires and runs, and with fresh oil it is as quiet as it ever has been. Hopefully even with the no-oil situation years ago, it will give many more miles of service.
 
Last edited:
  • Like
Reactions: DOWNS
Couldn’t resist, I went out there and tinkered some more. First order of business was to pull the 1995 distributor and make sure nothing was wrong with it. I compared it to my old distributor which when last installed, ran fine.

Only thing I noticed was that the oil pump drive was clocked slightly differently between the two. I got the distributors facing the same direction and then pointed both rotors straight up, and I noticed the early model was slightly more clockwise than the later model. So I thought maybe there was some weirdness between the two and maybe the new one had something wrong internally, though no idea how that could happen.

Since the split for the new distributor happened at the end of 1994, the 1994 FSM covers the old model and the 1995 FSM covers the new, and makes sure to mention that the distributor for 1995 is new and follows a different procedure. The only actual difference is the spot you set the oil pump drive to so that when you stab the distributor, the tip goes into the oil pump properly. 1994 tells you to put the drive slightly past 11:00, and 1995 tells you to put it slightly before 11:00. This makes sense, and coincides with what I found when I compared the two. So all good there.

Next up I set the motor to TDC for cylinder 1, so that I could start from square 1 with the distributor install. I put the oil pump drive to about halfway between 10:00 and 11:00 and it stabbed right in and the rotor landed right where #1 should be, about 5:00. Still sputters.

I did notice there is some slop, meaning I can turn the rotor back and forth slightly when the engine is off. However, that seems to be more cam gear related and not so much rotor or shaft related. The rotor seems to be pretty snug on the shaft.

I think tomorrow I’m going to try the old distributor again just to rule that out. Best case it works and I know where my problem lies. Worst case I find out the distributor isn’t the problem and focus on other things. It could also still be the cam sensor I suppose, and a distributor swap could also narrow me down in that regard also. I’m not sure what it is, but I’ll find it soon enough. I don’t enjoy finding TDC or stabbing dripping oily distributors, so I’d like to be done with this for sure.

The reluctor on my old distributor is pretty corroded, if you touch leads to it you don’t get any continuity and I sanded it for a while with very fine sandpaper. So maybe my long term if the old distributor works, is to refresh the reluctor and carry on.

Still could have a fuel issue but really, that’s unlikely.
 
  • Like
Reactions: DOWNS and ytradio
Went by Harbor Freight and bought a fuel pressure test gauge. Sure enough, fuel pressure was perfect. I didn’t think it was a fuel problem but that was certainly a variable. It runs very rough.

At this point I am thinking intermittently failing CMP sensor in the used eBay distributor, or slop in the distributor. The listing said the distributor was tested working and it was in really nice shape appearance wise, so who knows. Reluctor for the old distributor is ordered and will be here Thursday. In the mean time I think I am going to fire the parts cannon on the later style CMP and see if that solves it. If not, then I return it and then swap back to the old distributor and swap the reluctor when it gets here.

If it isn’t a distributor problem after all that, then I’ve got a lot more hunting to do, because nothing was wrong last time I ran it. I see no wiring damage, everything is plugged in, etc.

Starting to feel sick so might take the evening off. Although I can definitely manage swapping the sensor so that might be what I do tonight.
 
Last edited:
  • Like
Reactions: DOWNS
Well, good news. Apparently the distributor was off by a tooth. Not sure how that happened with multiple removals and restabs, but I checked TDC this afternoon and noticed the rotor was definitely not pointing in the right spot. No clue how I got that wrong last time I restabbed it, because I definitely did so off of TDC. Must have misinterpreted TDC slightly.

Thing runs smooth as silk. I’m going to get a new cap/rotor/cam sensor just to start a baseline. Other than that I should be good to fill the coolant, reassemble the dash, and hit the road. Hopefully I can get to the dash this weekend and maybe be able to take it for a spin. We’ll see.

One thing to note, never underestimate the stock motor mounts. I, like many others, have run parts store mounts, Brown Dog, M.O.R.E., etc. You gradually forget how smooth the stock mounts are over time. Then you go back and it’s like a whole new jeep. I haven’t driven this much at all in 4-5 years, but I definitely remember the vibes it had and what I experience now with new Mopar TJ mounts is amazing.

Also glad to be back to a stock style exhaust from Walker. Nice and quiet. I think the new comforts and the deeper gearing are going to make for a real treat to drive.
 
I understand that, the previous owner ran tap water for coolant and wasn't big on doing maintenance. I flushed the hell out of it and then did it again when I pulled it and flushed the hell out of it some more. I hope with the coolant/distilled water that it will clean up the block. I saw a YT video of a guy with an XJ that had a similar problem. He showed video of the block after 10k miles or so using proper coolant and the block looked really good behind the water pump and thermostat. So I am hoping that will be the same for mine.
My 95 XJ's block was still dark cast iron color when I swapped the water pump out 6 months ago. No rust. Distilled water with coolant concentrate. I change it once a year with new 50/50 coolant, and pull the overflow tank and drain it and clean the dirt out of the bottom of it.

Well, good news. Apparently the distributor was off by a tooth. Not sure how that happened with multiple removals and restabs, but I checked TDC this afternoon and noticed the rotor was definitely not pointing in the right spot. No clue how I got that wrong last time I restabbed it, because I definitely did so off of TDC. Must have misinterpreted TDC slightly.

Thing runs smooth as silk. I’m going to get a new cap/rotor/cam sensor just to start a baseline. Other than that I should be good to fill the coolant, reassemble the dash, and hit the road. Hopefully I can get to the dash this weekend and maybe be able to take it for a spin. We’ll see.

One thing to note, never underestimate the stock motor mounts. I, like many others, have run parts store mounts, Brown Dog, M.O.R.E., etc. You gradually forget how smooth the stock mounts are over time. Then you go back and it’s like a whole new jeep. I haven’t driven this much at all in 4-5 years, but I definitely remember the vibes it had and what I experience now with new Mopar TJ mounts is amazing.

Also glad to be back to a stock style exhaust from Walker. Nice and quiet. I think the new comforts and the deeper gearing are going to make for a real treat to drive.

People tend to forget that sometimes OEM actually is better. Engine mounts for our Jeeps is one of those items. When I first got my last XJ the motor mounts were basically in two pieces, they fell apart. I got some Anchor branded ones from Rock Auto which lasted about 8000 miles before I noticed them starting to rip. I put some brown down mounts in that use lower control arm bushings and wasn't happy with the NVH in the cab so splurged 140 dollars on a set of OEM Chryco mounts and they've been in there for over 100,000 miles now and still going well.

Folks are quick to discount actual legit OEM parts but really how long did those OEM parts last before they failed? Factory U-Joints, ball joints, engine mounts ect all typically last well over 100k miles no issue. But people label them junk because they fail at 100-200k miles and put an off brand in there, and it lasts 20k miles, maybe.
 
  • Like
Reactions: machoheadgames
People tend to forget that sometimes OEM actually is better. Engine mounts for our Jeeps is one of those items. When I first got my last XJ the motor mounts were basically in two pieces, they fell apart. I got some Anchor branded ones from Rock Auto which lasted about 8000 miles before I noticed them starting to rip. I put some brown down mounts in that use lower control arm bushings and wasn't happy with the NVH in the cab so splurged 140 dollars on a set of OEM Chryco mounts and they've been in there for over 100,000 miles now and still going well.

Folks are quick to discount actual legit OEM parts but really how long did those OEM parts last before they failed? Factory U-Joints, ball joints, engine mounts ect all typically last well over 100k miles no issue. But people label them junk because they fail at 100-200k miles and put an off brand in there, and it lasts 20k miles, maybe.
Yeah, I fully agree. I have never elaborated on how/why I've been through so many mounts, but basically back in 2014, I was still a noob to everything automotive, and had recently done my SYE and installed a double cardan shaft built by a local shop. My tire balance had recently been screwed up as well. The new driveshaft had vibes and the tires were shaking, so the whole thing was just a big mess to drive. I was too new to know to get the driveshaft rebalanced and to do the same with the tires, so I was looking for all causes of vibes and the internet led me to try new engine mounts. Put in the parts store junk from Anchor and they were pretty buzzy. They were in for probably 10-15K or so and I never had them physically fail but they did not do a good job of vibe isolation.

In 2016 I went with the complete Brown Dog kit, and it was a bit more of a step up in vibes, but I liked the secure driveline feel so I stuck with them for a while. Eventually swapped to MOREs for a bit better isolation (and still firm hold), and now I'm back to bone stock, picked up some mounts for a TJ. They are super smooth, and of course it has been since early 2014 that I have felt this level of smooth since that's when I started changing all this stuff 10-10.5 years ago. So it was nice and refreshing to be back to stock in that area.

I agree, typically OEM is the best quality you're going to get. It is rare that the stock design is a truly poor design. Sometimes they skimp on things like wiring or fastening, but for the most part OEM is the best it is going to get. The mounts are a good example.

I should add that I found a very overpriced OEM transmission mount that I also threw in a few years back, so I am entirely OEM on mounts. Recently installed new Crown rubber body mounts too and those are also doing well.
 
  • Like
Reactions: DOWNS
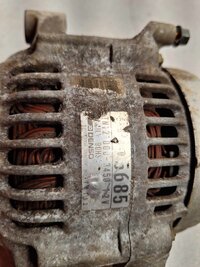
The ‘91-‘95 YJs came with either a 75 amp or 90 amp alternator. Like the majority of those YJs, mine came with the 75A. The way to tell is by looking at the Nippondenso sticker on it: 56005684 is 75A, and 56005685 is 90A.

I never had any problems with the 75A, but I also have never winched. I did notice that sometimes the voltmeter on the dash would dip some when I’d turn on the heater, and that could be due to wiring, old gauge, or the alternator. I do plan on adding a winch that I will use infrequently, but sometimes, so I decided to swap to the 90A. There is a common 1998 Durango 5.9L 136A alternator upgrade that people on other forums mention doing, and there’s nothing wrong with that if you need/want it, however, the stock YJ wiring is only safe with the factory YJ alternator options, aka the 75A or the 90A. It isn’t meant for 136A. So people end up adding their own wiring, their own maxi fuse, etc. If you need it that’s fine, I do not and don’t feel like adding all that for something I don’t need. So I decided to do the bare minimum upgrade that was easily to install with no extra work at all. I should also mention that on the Durangos, they used 4 AWG wiring for that 136A alternator, which goes to a supposedly 140A fusible link (fuse perhaps?), and on the YJ we have 8 AWG that splits into 2 10 AWG wires and runs through a 60A and 40A fuse. That is a significant difference. The TJ uses a 6 AWG cable (probably realized what they should have used on the YJ) with a short piece of 10 AWG as a fusible link.

Something to also understand is the way the alternators are rated is a bit misleading.

The YJ and 97-98 TJ utilize the exact same 2 alternators, 56005684 & 56005685. However, on window stickers, in parts stores, etc, they are mentioned differently. The TJ alternators are mostly called 81A and 117A while the YJ are the aforementioned 75A and 90A. I did some digging in the factory service manual and partly found out why.

YJ:

IMG_4896.jpeg

97 TJ:

IMG_4897.jpeg

98 TJ:

IMG_4898.jpeg

So the YJ has only the “rating” column and it lists 75 & 90 amps. The 97 TJ expands and breaks into minimum test amps and rated SAE amps. My guess is that the “rating” on the YJ chart is the minimum test amps, and at the time of the YJ they simply didn’t list the SAE rated amps.

The 98 TJ chart is a bit weird because the lower rated alternator drops its minimum way down to 57 amps (maybe a typo?) and the higher rated alternator is down to 88 amp minimum, which is very close to 90.

My thinking is the part numbers are the same and the PCM manages them the same whether it’s a YJ or a TJ. Call it what you want, but I like to think I have the “117 amp alternator” that TJ folk refer to. So I like to think I’m not far off from the 136A from the Durango anyway.

Enough about the details. I installed it this afternoon and we’ll see how it does.

It came in a Mopar box and the sticker says it was made in February 1999. Pretty old, but it’s great shape from storage so should be fine.
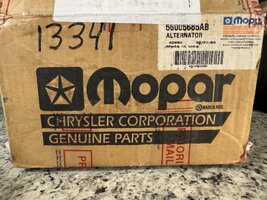
IMG_4892.jpeg


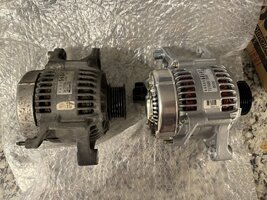
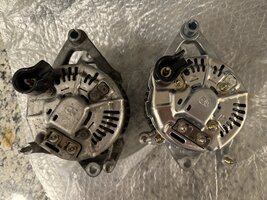
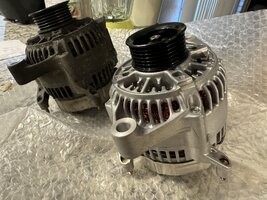
Some comparison photos, old vs new:
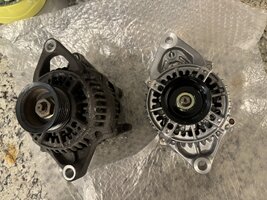
IMG_4889.jpeg

IMG_4890.jpeg

IMG_4893.jpeg

IMG_4894.jpeg

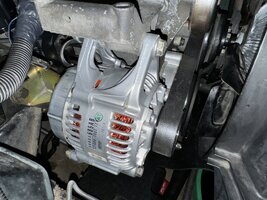
Installed:
IMG_4895.jpeg
 
  • Like
Reactions: DOWNS and ytradio
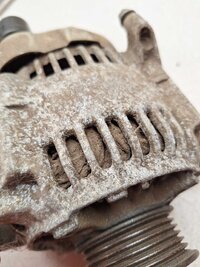
Some good information. I hadn't gotten to the alternator yet but it's something I had researched a little. I saw the Durango swap and had looked into it. When I bought my YJ, it sounded horrible under the hood and it turned out to be the alternator. My Jeep had been a mud jeep so it was no surprise that the bearings in the alt were gone. I see now that my YJ came with a 90 amp. My previous YJ had a new (reman) cheapie in it that I swapped into this one and have been using it for the time being but I installed a winch so I would prefer to have the 90amp back on it.

You can see why it was in bad shape lol

441956724_461978393034565_6539018301362494342_n.jpg


When I saw it had a Denso, I figured it was the original alternator.

436646113_1010782420613564_521068196567609195_n.jpg
 
  • Like
Reactions: machoheadgames
Some good information. I hadn't gotten to the alternator yet but it's something I had researched a little. I saw the Durango swap and had looked into it. When I bought my YJ, it sounded horrible under the hood and it turned out to be the alternator. My Jeep had been a mud jeep so it was no surprise that the bearings in the alt were gone. I see now that my YJ came with a 90 amp. My previous YJ had a new (reman) cheapie in it that I swapped into this one and have been using it for the time being but I installed a winch so I would prefer to have the 90amp back on it.

You can see why it was in bad shape lol

View attachment 123069


When I saw it had a Denso, I figured it was the original alternator.

View attachment 123070
Nice! I haven’t figured out which ones get which alternator. Other than the 3.55 gear package, my YJ was almost as bare of an SE as it could be, so that probably was why I got what I got. My guess is the Sahara, Renegade, and anything else special got the 90. I do know that most I’ve seen (I usually look when I remember) have the 75. One thing is for sure, my 75 was very reliable with no issues at all, so it is going in the box the new one came in and going on the shelf.