1994 Hunter Green SE “Back to Stock” Thread

Finally got my 7/16” ring gear bolts in and cleaned off, so I got the rear axle ring gear mounted to the TrueTrac. Will press on the inner pinion bearing and factory shim tomorrow and see where we land. I’m so ready to be done with these projects and have it sitting on its permanent axles so I can sell all the stuff I’m not gonna use.

Still waiting on Denny’s to get back to me to finalize the driveshaft order, but no rush on that because I need to get this rear axle under the jeep anyways so I can measure length.
 
  • Like
Reactions: DOWNS
What rear axle are you running? One of my end goals with my YJ is TrueTracs on both ends.
Dana 35

I have a D30 truetrac I've already removed. I'll sell it if you're interested since you're not that far away (work in Rockwall). Nothing wrong with it at all, it's still essentially brand new. It was installed but never ran. I decided to go open diff for now and maybe do a locker later.
 
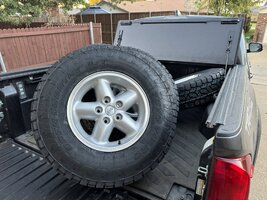
Well I got my tires mounted to the stock TJ wheels yesterday. Went with 30x9.5R15 Toyo Open Country ATIIIs. These have been excellent tires for me on my truck, so I wanted to use them on the YJ too. I had actually bought them in 31X10.5R15 for the 15X7 American Racing wheels. But as part of the "back to stock" motive, I don't want 31's. 30's fit perfectly for what I'm doing, better than 31's. With 31's I would have wanted a body lift.

The 30's fit like I want them to. The tread doesn't stick out from the fender flares, and these shouldn't rub at all either. If they do, one minor washer under each steering stop will fix that. The 9.5" width is definitely noticeable over the 10.5" width 31's.

Overall I think this provides a really classic look, and maintains all the things I wanted (mostly keeping the tires under the flares and maintaining stock handling).

IMG_2401.JPG

IMG_2402.JPG

Haven't had a chance to mount them all, once I do I'll post up more photos. I'm really happy with how these turned out.
 
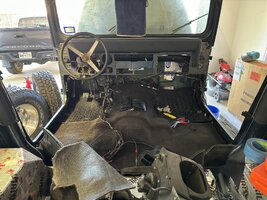
Can’t say I’ve made a bunch of progress but I’m doing it bit by bit. I’m a bit burnt out on the axle projects so I’ve paused that work for now. Started working on cleaning up the interior and today started preliminarily putting down some pieces of my carpet kit. Mostly to see how it fits, but I’m not far from making holes and fastening it down. I figure it makes more sense to get the carpet all down, then finally focus on reassembling the dash. I don’t like my current dash pieces anyways, they need to be refreshed big time, so I’m going to reassemble that for driving but eventually dash refresh will be a project of its own.

Anyways, cleaned out a bunch of crap and vacuumed it out. Removed the shifters so the carpet can lie flat while I make the cuts and holes I need to make before reinstalling the seats and such.

Got the tailgate carpet piece installed. Just used spray adhesive and held it on for a bit. It seems secure, hopefully it doesn’t come off but if it does I’ll deal with it then.

IMG_2462.jpeg

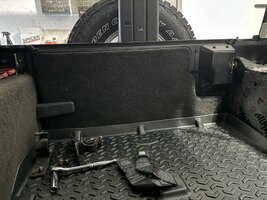
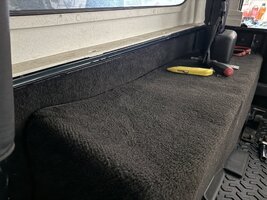
The wheel wells are a bit tricky. They’re a bit baggy, so I think these pieces are just going to forever fit funkily….not super happy with it but not sure what else to do. They’re not going anywhere, but they are baggy. The angled corner on the fenders has around half an inch between itself and the carpet’s molded corner. The carpet will be held down by speaker boxes so, whatever.

Glued down the wall piece that goes from the roll cage B pillar to the back of the tub. Stuck it to the wall with spray adhesive.

IMG_2463.jpeg

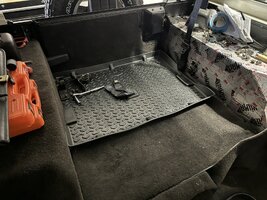
Got the rear floor piece in place but just lying there. I made the seat belt buckle hole for now, but will need to hole saw the rear seat bracket bolt holes. Need to buy a 5/8” hole saw. Went ahead and laid down the rear cargo mat as well to see how I like it. Punched out the buckle opening it too. Looks good. Functional.

IMG_2461.jpeg

The front floor will be the worst part. Mostly because of the shifter cutout. I went ahead and laid it down for now, and punched a small hole in the shifter location, but I’ll need to do a lot more than that before it’s done.

IMG_2449.jpeg

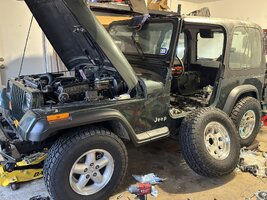
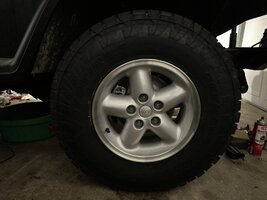
And then for fun, I walked by a wheel and snapped a pic up close. What a classic looking wheel. I am thrilled with how the wheels and tires turned out in regards to “stock.” I’ll finally get a full Jeep pic once I clean up the garage and the Jeep.

IMG_2451.jpeg
 
  • Like
Reactions: HRDROKN and ytradio
Still plugging away at the carpet. I reached the stopping point last time when I got to the shifters. As most of you know, the inner shift boot is captured under the shifter sticks, which is a pain. My factory boot was torn a long time ago when I needed to remove it and had no way to do so without tearing it off. So it was no longer doing the job of keeping out heat. so I ordered a new factory boot. Mopar part #53005554

The transfer case shift rod is held to its base with a rubber isolator and a metal clip that locks onto the shaft and then clips into the shifter stick with some winged tabs. Last time I installed a new isolator and clip, I didn't know what I was doing and I installed them too far onto the stub. This made removing the old one really difficult. I also had to beat the hell out of the stick to install it last time, so my stick was rusty and dented. So I ordered a new used one from eBay in much better shape. The transmission shifter cane is just a tight fit onto the shift lever base, I reused that stick.

My transmission shift lever base was worn out (bought used on eBay 7 years ago), so I was hunting for a new one. Where it was worn was in the slots that locate it to the pins in the transmission shift tower. So I began the search for new. The factory part number is 5252055, and it includes the spring, locking cap, and upper boot that seals it to the transmission. I bought a 5252055 replica kit from Allstate gear. The parts looked the same....however, the square stub was too skinny and the shifter cane just slid right on.

Here's what I got from Allstate
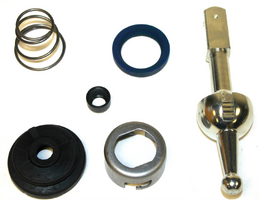
1700061675989.png

Obviously, the aftermarket levers are a crapshoot, so I started hunting for stock. I found this:


1700062022517.png


A few things to note:

1) He calls this a "short" shifter. First of all, the correct term would be "short throw" if it were anything. This is not short anything though, this is a stock shifter and then a Novak supplied unbent stick. The throw will be exactly the same as stock, if not actually longer because that stick is longer than stock which affects throw.

2) This is for a YJ technically, not a TJ. The YJ models use the straight shift lever. TJs have an S-curve to them that relocates the shifter around 1.25" further to the rear. So if anything, this guy should be marketing to the YJ crowd, not TJ crowd.

3) $199??? That's a lot to ask for. the whole reason these parts are for sale is because they came off of his brand new transmission and he couldn't use them. That right there makes them not so valuable. Nobody wants that shifter stick. But anyways....


I needed a factory shift lever to restore the tight fit of my shifter cane. I was considering reaching out to the Craigslist guy and offering him some money to just take the shift tower (or even just the lever), but it occurred to me to check my parts bin. I bought a new AX15 years ago and I didn't use the straight lever that my transmission came with. Reason being, at the time I was using a B&M short throw and so I maintained that. I did eventually go back to stock, but to do that I went with a used cane and lever off of eBay, since I didn't have a good way to press apart the cane from the lever to install it onto the new lever that came with the transmission. So the new lever sat in storage for 7-8 years.

Lo and behold, I found it in the bin last night. Confirmed - very tight fit with my old cane. This also confirmed for me that the kit from Allstate was for sure too small, so I will be sending that back.
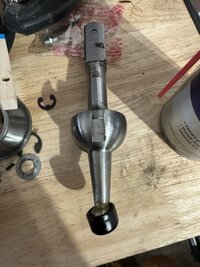
IMG_2559.JPG

So....I installed this lever into the transmission, I installed the 4x4 base onto the transmission and transfer case, and installed the inner shift boot. Also installed the cane onto the lever.
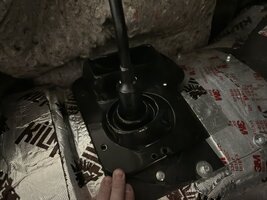

IMG_2560.JPG

With the shifters being tied together via one boot and the boot captured under the press fit shifters, dealing with this stuff is just a total PITA. I'm glad I'm almost done.

After the levers for t-case and transmission are installed, the inner shift boot is slid over the top of both, meaning the two shifters are tied together as I mentioned earlier. That boot is fastened to the floor/tunnel plate, and then the accordian style boot comes down over the top of both shifters tying them together a second time, and fastens to the floor through the unused holes in the first boot, using self tapping screws.

Years ago I was tired of most of my self tapping holes not holding the boot down firmly, so I decided to drill out the holes and use nutserts. That was not a great move, as then it became very difficult to get the bolts to all line up since they now had threaded holes with no tolerance.

I have still maintained the stock design, by buying two brand new Mopar boots (inner & outer). I don't like it, but I don't plan to have to work on it so it is what it is. I was able to fasten down the inner boot like normal. I was able to get 2 of the machine screws into their nutserts. There were 3 holes I never installed nutserts in, because their self tappers still held fine. So I got those in. I was able to get a self tapper to grab one of the nutserts without stripping it, so that is also holding. Overall between the 6 fasteners I got to hold the boots down, they are not going anywhere.

Last piece of the puzzle is to install the carpet with a cutout of the right side to go under the last accordian of the boot. this makes for a nice clean finish and it doesn't have to be absolutely perfect. Some people instead capture their carpet under the shift boot ring, but that makes installing the screws for the boot very difficult and your carpet cut has to be about perfect. It also makes the whole mess look less finished, because the carpet doesn't end up covering the screws. So I prefer the method I used...cut the right hole and just tuck it under the last accordian.

Overall I think it turned out well! All done on the shifters, including new factory style knobs. Shifts are a bit stiff, but will loosen up with time. All transmission gears and all transfer case positions shift fine.
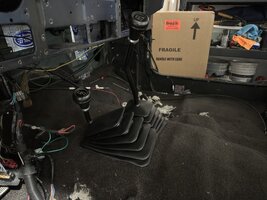
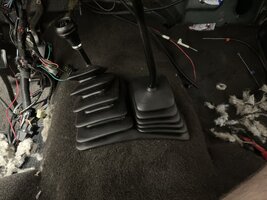
IMG_2566.JPGIMG_2563.JPG

Now I need to finish the left wheel well, do some more trimming of the main floor carpet at the rear side, and then I can finally reinstall seats and console soon.
 
Yeah the boots are no fun, but they make a huge difference in drivetrain heat getting into the cab.
100% agreed there. Definitely worth having them to prevent heat entry. Just wish they were a better/easier to use design. My main beef with them is due to the inner being stuck under the sticks and then both being in one boot which makes it that more clumsy to install or remove. I think in the future though, I'll be able to wiggle off the 4x4 shifter in the Jeep so that won't be too bad to remove I don't think. Hopefully don't have to touch it for a long time though.
 
I couldn't get the shift knob off and ended up twisting off the threaded top off the shift lever. I gave up trying the transfer knob.
 
I couldn't get the shift knob off and ended up twisting off the threaded top off the shift lever. I gave up trying the transfer knob.
Yeah I’ve sheared a transfer case knob stud before. I think I had installed the jam nut too tight. I don’t really remember. But anyways because of that, I’m actually on my third t-case shifter cane. The 2nd one (1st replacement) is the one I beat to hell installing and then was a pain to remove because I installed it wrong. Lived and learned, I should be able to take care of the new one indefinitely.
 
  • Like
Reactions: Flyer58
Yeah I’ve sheared a transfer case knob stud before. I think I had installed the jam nut too tight. I don’t really remember. But anyways because of that, I’m actually on my third t-case shifter cane. The 2nd one (1st replacement) is the one I beat to hell installing and then was a pain to remove because I installed it wrong. Lived and learned, I should be able to take care of the new one indefinitely.
I have seen that Novak makes shifters for the 231, most I believe are for retro fitting into something else. But do you know if they have one just to replace the one on the YJ and if it’s easier to assemble and disassemble than the stock one?
 
I have seen that Novak makes shifters for the 231, most I believe are for retro fitting into something else. But do you know if they have one just to replace the one on the YJ and if it’s easier to assemble and disassemble than the stock one?
It’s been a while, years ago I looked into their 231 shifters. There was a cable one and a non cable. The non cable was very similar to what we already have, except instead of the stick slipping on with a clip and isolator, it was a clamp that the stick slid into and then tightened the bolt to clamp the stick in place.

The cable version was for TJs and was so different that it wouldn’t be worth trying on the YJ (IMO).

The non cable version, not very many people had it so not much real world reviews, but the one or two I found said it was difficult to get it shifting well. Also, bending up the stick to your liking is probably a pain.

At the time of this research, I didn’t realize how the factory one worked. My isolator had long disintegrated and so the stick would wobble around and would come right off the stub if I pulled on it. Eventually I realized the stock one was easy to fix so I went with that route. Personally I think the stock shifter works great, only thing is occasionally you have to replace the isolator/clip and taking the mess apart with the boots is not exactly enjoyable.
 
Last edited:
  • Like
Reactions: ytradio
It’s been a while, years ago I looked into their 231 shifters. There was a cable one and a non cable. The non cable was very similar to what we already have, except instead of the stick slipping on with a clip and isolator, it was a clamp that the stick slid into and then tightened the bolt to clamp the stick in place.

The cable version was for TJs and was so different that it would be worth trying on the YJ (IMO).

The non cable version, not very many people had it so not much real world reviews, but the one or two I found said it was difficult to get it shifting well. Also, bending up the stick to your liking is probably a pain.

At the time of this research, I didn’t realize how the factory one worked. My isolator had long disintegrated and so the stick would wobble around and would come right off the stub if I pulled on it. Eventually I realized the stock one was easy to fix so I went with that route. Personally I think the stock shifter works great, only thing is occasionally you have to replace the isolator/clip and taking the mess apart with the boots is not exactly enjoyable.
Yes the boot situation is where I will loose my,,,,,crap.
 
Yes the boot situation is where I will loose my,,,,,crap.
Are you just needing to replace the isolator and clip and are they already bad?

That job is not too terrible, because the isolator clip connection lives below the upper boot but above the lower. So you remove the 7 factory hex screws, remove the upper boot (and knobs so boot comes off), then you press the winged tabs on the clip through the little access windows while working the stick off. But if your isolator is bad, the shifter will probably come right off.

Either way, dealing with the upper boot only is not that terrible. My situation is worse because I used rivnuts, I shouldn’t have done that.
Starting from scratch. Trans and X fer case were both out when I bought Jeep. I removed the boot when tearing the body down, and could see then that it was going to be a bear (probably) to get back over both shifters. It will be some time before I’m at that point. We will see.
 
Starting from scratch. Trans and X fer case were both out when I bought Jeep. I removed the boot when tearing the body down, and could see then that it was going to be a bear (probably) to get back over both shifters. It will be some time before I’m at that point. We will see.
My biggest problem with the boots is that I was tired of the self tappers not being tight or even snug on some of them, so I tried to solve the problem with nutserts which was a mistake. The nutserts have no tolerance for the bolt alignment so everything has to be perfect. On a curved trans tunnel, that doesn’t work very well which unfortunately now I realize.

The boots in fully stock form are not that bad, main part that sucks is the inner being under the shifters. It’s not the end of the world to wiggle the transfer case shifter off (inner boot will then come up), remove trans shifter+boot as an assembly, take to the vise to separate, and then reassemble in the Jeep after installing the trans base into the trans.
 
  • Like
Reactions: ytradio
On the broken studs for screwing on the shift knobs. I forget the thread pitch of the knobs but it's an easily obtainable bolt. I cut the head off of a bolt and welded it to the top of the cane where the old stud had been broken off by a previous owner. Cleaned it up with a flap wheel and repainted. Good as new.

As far as fitting the boots over the shifters. You CAN fit them over the shifters without removing them, just use some lube of some sort, clean it off after as best you can to prevent reactions with the rubber. I used some silicone spray lube and it slipped right on over the shifters no problem.
 
  • Like
Reactions: machoheadgames
On the broken studs for screwing on the shift knobs. I forget the thread pitch of the knobs but it's an easily obtainable bolt. I cut the head off of a bolt and welded it to the top of the cane where the old stud had been broken off by a previous owner. Cleaned it up with a flap wheel and repainted. Good as new.
It’s 3/8-16 - that welding trick would definitely work. I had no welding capabilities and the new stick was like $40 at the time so figured that was easiest.

As far as fitting the boots over the shifters. You CAN fit them over the shifters without removing them, just use some lube of some sort, clean it off after as best you can to prevent reactions with the rubber. I used some silicone spray lube and it slipped right on over the shifters no problem.
Hmmm this seems surprising. Getting the inner boot holes over the square stubs was already a challenge - the holes are much tighter than the square stubs. Getting the holes to expand over the shifter base would be significantly worse. I’d expect to tear the rubber before that would work.

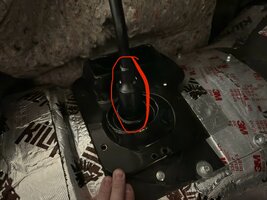
Just to confirm, you were able to pull the inner boot off over this portion? I would really think this amount of stretch would either tear the boot or stretch it so much that it wouldn’t seal properly to the lower transmission lever afterwards.

IMG_2560.jpeg
 
It’s 3/8-16 - that welding trick would definitely work. I had no welding capabilities and the new stick was like $40 at the time so figured that was easiest.


Hmmm this seems surprising. Getting the inner boot holes over the square stubs was already a challenge - the holes are much tighter than the square stubs. Getting the holes to expand over the shifter base would be significantly worse. I’d expect to tear the rubber before that would work.

Just to confirm, you were able to pull the inner boot off over this portion? I would really think this amount of stretch would either tear the boot or stretch it so much that it wouldn’t seal properly to the lower transmission lever afterwards.

View attachment 122147

Correct. It was a stretch, but it did go over both the trans shifter cane and t-case shifter cane without tearing or deforming. That larger portion of the cane is smoother than the square part of the shift assembly so I figured that's why it went over alright, that and generous lubrication. I've even pulled it back off of there after some more silicone lube and put it back over without tearing up the boot. And this is a 27 dollar Fairchild boot from Rock Auto, not a MOPAR boot.
 
  • Like
Reactions: machoheadgames