Novak Conversions Jeep Wrangler YJ radiators

1994 Hunter Green SE “Back to Stock” Thread

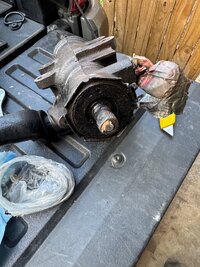
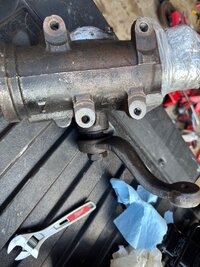
Nothing zaps energy like failed plans. The gearbox I ordered is clearly not the one from the photos. It has a clunk when I shake the pitman arm back and forth, so no way I’m installing that on my Jeep. It has a drop pitman arm, while the one I bought had a stock arm in the photos. The stock box I ordered looked clean, this one has random paint sprayed over pitted rust in areas, and no paint in other areas. There is some weird green goo in the area of the lash adjuster, making me think it’s been messed with before. No thanks. Contacting the guy to see if he has the actual one I ordered. If he doesn’t, I’m sending this junk back and the hunt will continue.

IMG_1160.jpegIMG_1161.jpeg

So onto the tow hitch. I read the reviews of the Curt hitch I ordered, so i somewhat knew what to expect: holes not lining up. I didn’t, however, expect it to be nearly as bad as it is. Basically, almost none of the holes work. You can get the 8 horizontal bolts in, barely, but then you can’t get the lower 2 in, and those are the important ines. Right off the bat, the two slots for the lowers do not reach a maximum width that covers both bolts. So you can’t get in the 2 lowers no matter what you do. So I took a dremel to them. Widened them up some. Kept test fitting.

I did after about 5 tries, finally get it to bolt up. However, it still barely goes on and I had to hammer some of the bolts in, which really isn’t ideal.

After that; the bolts are pretty ugly. I don’t like shiny grade 8 zinc on an other stock appearance, so I didn’t want to use them.

Turns out those bolts are actually even smaller than the stock bumperettes bolts, which helps them work with the misaligned holes. So if those barely fit, the larger bumperette bolts definitely won’t work.

I’m giving up on the tow hitch for now and just installing the bumperettes. Eventually when I feel like installing a tow hitch again, I’ll get back out there and remove the bumperettes to throw the hitch on. Until then, I can’t tow.
 
What a long, busy weekend. Friday evening I pulled the tank, tried to install the tow hitch and bumperettes, and gave up on the tow hitch part. Just installed the bumperettes. I left the tank out for continued work the next few days.

Saturday morning I started bright and early around 7 AM on the rear axle swap. I won’t get into the details here, as I’ll make a dedicated post for the details of the axle assembly, but it was an ass kicking for sure. I had it on all fours again by the end of Saturday.

I spent most of Sunday still working as well, messing with the rear leaf springs, undoing some previous tow hitch wiring for the ARB bumper, reinstalling the tank, and then cleaning up the garage.

Overall, the 4.10 gears and 28” tires drive really nicely. I like the gear spacing a lot. It’s almost exactly similar to 4.88’s and 33’s that a lot of people run.

Installed a 40 tooth speedometer which got me back to factory level calibration.


Still having some issues with a whining bearing noise while the vehicle is rolling (I was waiting to see if somehow the old axle was making noise)….made no difference whatsoever. Still the exact same noise. It is too fast and high pitched to be a wheel bearing, and the axles are new and I know the bearings in them are working fine.

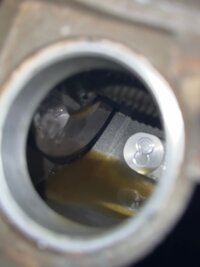
So today I pulled the speedo gear and peeked in the tail housing of the transfer case. I noticed very little fluid in there. There was some, and when you remove the driveshaft, you can tell there is some oil on the slip yoke, but it’s definitely not what it should be. It should drip when you pull the driveshaft…which I didn’t have happen at all.

IMG_1222.jpeg

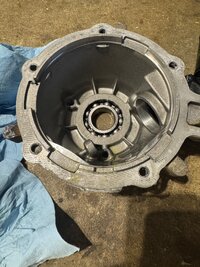
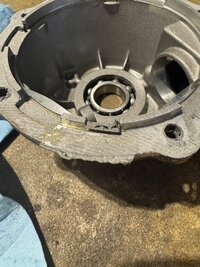
I needed to investigate, so I pulled the driveshaft, pulled the extension housing, and pulled the tail housing. I noticed something….

IMG_1224.jpeg

IMG_1225.jpeg

IMG_1226.jpeg

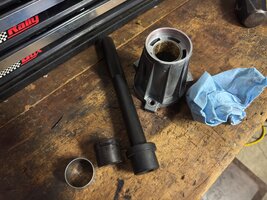
If you look closely at the first two photos, you’ll see the chunk of RTV and the notch in the tail housing. That notch appears to be how oil sneaks past the oil pump and fills up the tail housing with oil from the main case area. I had a convenient little piece of RTV right there in that notch that must have come from over application. You can see in the third pic that the piece of RTV fits perfectly in the notch.

So I’m pretty sure the bearing was running in inadequate amounts of fluid, which explains vehicle speed related noise. Hopefully that didn’t do any damage. The bearing runs good by hand, but ya never know what these kinds of scenarios cause later down the road.

I’ve noticed another leak at the case halves, and also since I decided to do the CAD bypass, I am going to open the t-case back up and do the true neutral plate. At this point I’m just going to pull the whole thing back out so I can do a damn good job of sealing it this time.

So now I checked a bunch of items off the list with the axle. I’m going to rebuild the rear back into the stock 3.07 axle it was before, and sell it. I’ll get this t-case done and then it’s back on the road with no real hangups.
 
  • Like
Reactions: Plastic Fury
Dana 35 4.11 Rebuild

Like I mentioned in Post #160, I picked up a set of stock 4.10/4.11 axles off of a guy a few hours away that pulled them from a 1995 YJ 2.5L 5-speed. I completed the front axle build and swap back in April 2025, but due to being either busy and/or experiencing poor weather, the rear axle took an additional month to get around to.

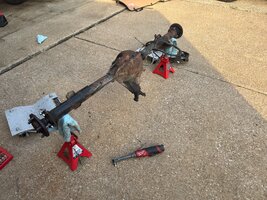
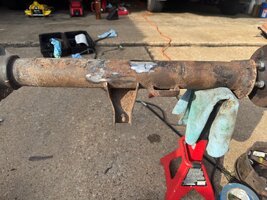
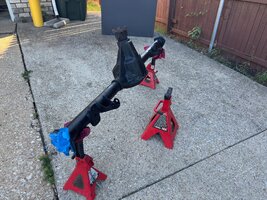
Last week, I finally began to teardown the axle, followed by the eventual stripping, cleaning, and reassembling of it for install. Starting last weekend, I drug the axle out to the driveway and put it on jack stands to clean it off.

Documenting its initial condition:
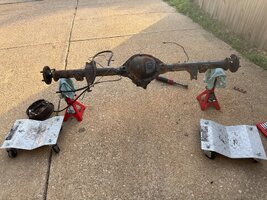
IMG_1079.JPGIMG_1081.JPG

First order of business was to remove the extra curricular. Mostly brake lines and brake line bracket, the rear brake hose, and the breather and breather hose.

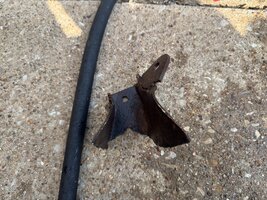
Next up was to cut the track bar bracket off, which was mangled and useless by this point. The rear track bar serves very little purpose, so I don't really care about losing it. If the bracket was there, I'd probably run it just because. However, my current tailpipe is in the way of the track bar anyways, and so it wouldn't work in this application regardless. I lopped the bracket off by cutting it close to the base with a 4.5" cutting wheel, then I sanded down the remaining bracketry and welds with an 80-grit flap disc until eventually I was down to the tubes. Overall easy process, just need to exercise a steady hand, caution, and patience.
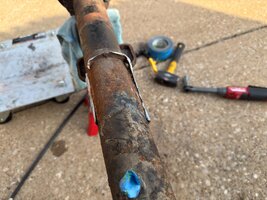
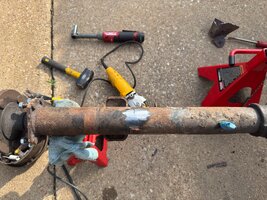
IMG_1085.JPGIMG_1086.JPGIMG_1088.JPGIMG_1089.JPG


Once the axle bracket was fully gone, I turned to cleaning. Lots of oven cleaner, Super Clean, scrubbing, and water. After about 2 hours, I finally had it pretty clean and let it dry.
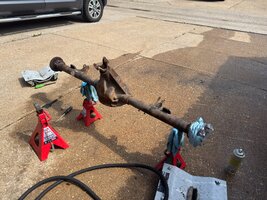
IMG_1099.JPG

The axle was directly in the sun and dried pretty quickly, at which point I hit it with the needle scaler several times, and then blasted all the rust dust off with the air compressor. Once it was clean and not dusty, I shot it with a couple coats of rust reformer. It started to rain not long after that, plus I had other things to do that day, and so I put the axle back in the garage and left it alone for a few days.

On Monday the following week, I took it back to the driveway for paint. Nothing crazy, just trying to keep it looking black, as opposed to rusty brown. Two coats of VHT epoxy later, and it looked good enough for me.
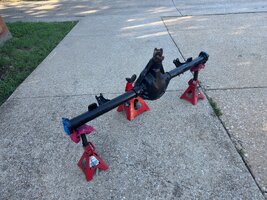
IMG_1133.JPGIMG_1135.JPG

Finally, this past weekend, I did the rebuild and swap. It took me overall about 2 days, but it involved more than just a straight swapping of axles. I needed the yoke out of the old axle, as well as the axle shafts.

Axle sitting on the pipe stands, ready for me to go to work...
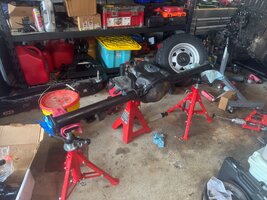
IMG_1164.JPG

I emptied out the housing by zipping off the pinion nut and hammering the pinion out of the outer bearing. Housing all cleaned off and races removed:
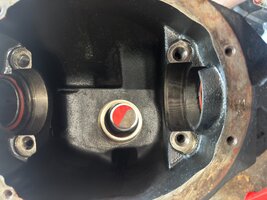
IMG_1169.JPG

Installed the new pinion races by hammering them into place with the appropriate drivers:

IMG_1170.JPEG

Yanked out the old wheel seals and roller wheel bearings using a slide hammer, and then installed new Spicer flanged double lip seals and Spicer (Koyo) bearings. Interestingly, the original bearings were Torrington brand, which is not what you receive when you buy anything "OEM" today. Words were facing out, so I installed them facing out. Another interesting note is that the stock seals are not flanged, they are just hammered in and I guess you go until they stop. I like the flange style because they put a bead of dry silicone around the outside which works its way up against the axle for extra sealing once the seal is fully installed. Photo below of the finished product, all you can see here is the seal of course.
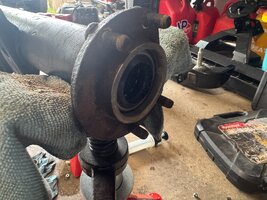
IMG_1166.JPG


Pinion was ready for its new inner bearing work to be done, so I took it over to a clean workspace so I could work the magic with the clamshell puller.

Ready for pulling using the old race removed from the axle:
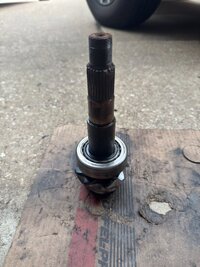
IMG_1171.JPG

Bearing zipped off. I measured the pinion depth shim at 0.038", which is fitting considering this pinion head has a +3 on it, meaning it is a bit deeper than normal. So they used a thinner shim. Most D35's use around a 0.041-0.042" shim on a perfect pinion head.
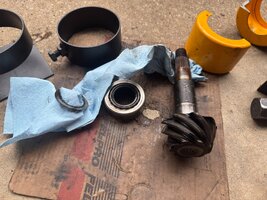
IMG_1173.JPG

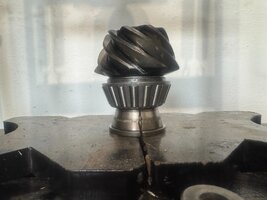
I used a Dremel and cut the old bearing to pieces, saving only the inner race. I took that inner race and cut a slot in it for expansion purposes, so I could use that race to press the new bearing on, without the old race getting stuck on the pinion during the pressing process. Race cut and the pinion, new bearing, and old race assembled in the press:
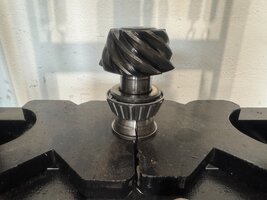
IMG_1174.JPG

Came up with a stack of steel stock to waste travel on the press. I wish presses had more intervals for shelf height. I am always having to stack a bunch of crap to reach what I'm pressing.
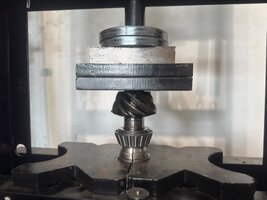
IMG_1175.JPG

Pressed on:

IMG_1176.JPG

No more photos besides the axle under the Jeep, but I continued on by pointing the axle pinion pocket upwards, dropped the outer bearing into its new race, lubricated it and then installed the seal. I dropped a new crush sleeve on the pinion and installed into the axle. Using a new Spicer pinion nut, I zipped it down with an impact until it got tight. Then I kept hitting it with the impact, bit by bit, until the yoke no longer moved in and out (crushing the sleeve to the point where the bearings finally seated in the races - the crush sleeve when uncrushed will keep the bearings completely loose initially).

I made small adjustments from this point using a pipe wrench to hold the yoke, and a breaker bar. This process is not fun. Lots of small adjustments, and then checking to see where you landed. I first landed on 10 inch pounds, then went a tiny bit more and ended up around 19. The spec is 15-35 in-lbs, which honestly, I think 15-20 is what you want. Anymore and it wears the bearings out prematurely. Definitely don't want to do 35 in-lbs if you can avoid it.

Next up was carrier bearings, which I removed the old using the clamshell puller, and then tapped on new bearings using the race of the old bearings. I cut the old rollers and cage off, then just used the race and a race driver. They tap right on in about 5 taps. Dropped the carrier into place and installed the factory outboard shims on the same sides they came from. Oriented bearing caps properly and torqued to 57 ft lbs, per the FSM.


At this point I was ready to throw the axle under the Jeep, so I manhandled it over to the small jack stands I had under the bumper area, and walked it into place and then hooked up the leaf springs. Once it was sitting in place, I reinstalled the drum backing plates, slid in the axle shafts, and bolted one the cover to fill it up with fluid. Of course all the normal stuff too, like hooking up brake lines, bleeding brakes, bolting down the brake line bracket, etc.

Installed:
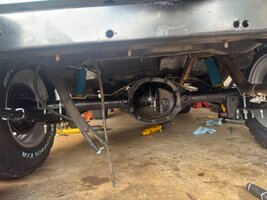
IMG_1181.JPG

Not much else to say, it's a pretty simple swap. I will give one pointer though:

Don't turn the axle shafts after inserting into the carrier. I knew this, but didn't think in the moment and one of the spiders fell out. No big deal, except one of the thrust washers rolled 5 feet away and I could not find it. I ended up subbing in an old used thrust washer, which is not ideal. Go figure, once I got everything buttoned up and fluid filled, I then found the thrust washer, and tore it back down to swap the new washer in.


After all the shenanigans were done, I reinstalled the tank on Sunday then went for a drive. It drives well, power/gearing wise. I am happy with 4.11s and 28" tires. Highway speeds are about 2800 rpm at 70, which feels great to me. I'm glad to finally have found a factory set of 4.11 axles that I can use and know they are built right in stock form, and have all new bearings to roll on.
 
  • Like
Reactions: Plastic Fury
Don’t want to be too hopeful, but maybe some good news soon. I ordered a second tow hitch which came in today. I measured against it and compared it to the first one and pretty much every single bolt hole on it was 1/8” further away from the corresponding hole on the other end of the hitch. So like I said the first hitch, if you held it up to the frame you couldn’t even get the lower 2 bolts in at the same time at all, with the extra 1/8”, hopefully I can now. Same for the 4 horizontal bolts on each end, those were really painful to get into place where now they have 1/8” more distance and hopefully should fit fine now.
I also got tired of the Borla exhaust rattling problem and decided to try a Banks catback kit off the recommendation of my friend. I got if installed and believe it won’t rattle and if somehow it does, I also believe I’ll be able to adjust it enough to fix that. It does seem a bit louder than the Borla which is annoying, but we’ll see how it is on the road. If it’s quieter than the magnaflow, then it’s a win. If it’s not, then I’ll just put the magnaflow back on and send the banks back too. Hoping to return the Borla in store next week.

Lastly, no progress on the transfer case yet. Been a busy week and I’m headed out tomorrow, so I’ll try to work on all of these things next week to hopefully wrap up most of the pending work.
 
  • Like
Reactions: ytradio
Hey all, some of you may have seen my other build thread. I think I’m going to stop using that one. Over the years there’s just been too much done, undone, and changed and it just makes for a confusing read.

I have recently decided that I want to put my Jeep back to stock in most ways related to the functional design. This means stock height, relatively small tires, stock steering & angles, stock axles, BUT can also include some functional improvements, like a TrueTrac LSD rear, possibly a front locker, LED lighting, better audio, etc. Essentially, this is my take on a true OEM+ type of thing.

The backstory as I outlined in the other thread is that this was my grandpa’s YJ. He was the third owner. He died in 2008, I bought it from my grandma in 2013. It was the summer of 2013, before I started senior year of high school. Best summer ever.

How it was when I got it:

View attachment 121884

The YJ came with some dry-rotted 31x10.50s, aftermarket chrome steelies, 6” fender flares, side steps, door armrests, a windshield sticker and a spare tire cover. Otherwise, it was bone stock. The tires needed to be replaced and since I was new to automotive, I figured I should just stay with the tire size that was already there, so I got a set of 31x10.50 Duratracs. The chrome steelies weren’t my thing at the time, so I got a set of Cragar black Soft 8 steelies.

How it was after the new wheels/tires:

View attachment 121885

The 31’s looked pretty cramped as they always do on stock suspension, so naturally instead of downsizing the tires, I opted for a lift. This is what started the unfortunate mod cascade that I could never seem to bring to a halt. Long story short, I went through multiple suspensions, including Rough Country 2.5”, BDS 3.5”, and OME 2.5”. I loved the OME 2.5”, but ultimately I don’t want lift anymore. The other two lifts were garbage. BDS was horrible.

After the 2.5” lift (it did look sharp)

View attachment 121886

Supporting mods for those suspensions:
  • JB Conversions SYE
  • Adams driveshaft
  • Tummy tuck (for 33’s that didn’t happen)
  • Motor mount lift (for the 33’s)
  • Body lift (for the 33’s)
  • Drop pitman arm
  • WJ suspension
  • 3/8” MORE Shackles
  • Pinion shims
And I’m sure there are plenty of others I’m not thinking about.

Eventually what changed my mind on all this is that I stared to ask myself - “what is all this for?” Over the years it seemed to handle worse and worse, which I sort of answered with “it’s a Jeep,” but I don’t like that answer. It doesn’t have to handle like crap; it didn’t when I bought it. The mods I’ve spent years worth of time and money on literally provided no benefit except maybe cool looks. But even a stock jeep looks really nice to me.

Eventually I said screw it, I’m going back to stock, and that’s that. With that, here are the plans:
  • TJ Grizzly Silver 15x7 5.25” BS aluminum alloy wheels
  • 30x9.5R15 all terrains (little bigger than stock 27.5s)
  • Dayton stock height non-HD suspension (4-leaf front 5-leaf rear) (done)
  • All new stainless brake lines from Inline Tube (done)
  • All new flex hoses for front calipers and rear frame to axle brake hose (done)
  • Rebuild front Dana 30 HP with 4.10 gears (possible e-locker eventually)
  • Source and rebuild rear Dana 35 with 4.11 gears and Detroit TrueTrac
  • Stock Chrysler/Mopar pitman arm (done)
  • Transfer case rebuild, converting back to stock slip yoke design
  • Stock new AX15 (done)
  • Stock sway bar links
  • Reinstate stock track bars
Some of it is not “stock,” but are improvements. Such as the gearing and traction devices. I am okay with these not being factory. Open diffs don’t benefit me and neither do tall gears. The design intent is still stock.

I’m sure there is plenty I’m forgetting on this list as well. I probably come across as crazy for doing this, especially with as much money as I’ve spent. It’s unfortunate I change my mind so much, but I just can’t ever let myself not sweat the small stuff. There were many aspects about the build that I just didn’t like anymore, and going back to stock is the one true way to get the YJ handling the best it ever has. I’m honestly stoked for the results.

I’ve already gotten started on some of the stuff, I’ll try to update the thread as I go. I’ll eventually be doing things like an amp and speakers as well but I just really need to get this thing on the road. I’ve said it for years, it’s not that far from hitting the road but I keep finding reasons to tinker. With me reinstating the stock design that should come to a close soon. Right now I’m just waiting on more parts.

So there’s the backstory and about as much as I want to drone on about the history. Too many words is just not interesting and I’m probably beyond that.

At this point, I’m just bringing it back to what it once was in its past, and this thread will be dedicated to that purpose!

Hi. I am a new owner of a 1992 Jeep YJ, and I also want to bring things back to stock. What type of shocks did you use when you changed out your suspension? I am very new to all of this so forgive me if this is not a smart question.
 
Hi. I am a new owner of a 1992 Jeep YJ, and I also want to bring things back to stock. What type of shocks did you use when you changed out your suspension? I am very new to all of this so forgive me if this is not a smart question.

Not a dumb question at all. I went with Bilstein B6 4600 shocks. They are one of the only good quality brands offering shocks in the stock length for a YJ.

Front - 24-013093
Rear - 24-013109

They are a bit stiff, but I wouldn't say harsh. Overall they work pretty well. For a softer ride, Old Man Emu sells shocks that are about 1" longer than stock, and they work fine for a stock YJ as well.

Thanks for the info. I’ve seen a lot of Old Man emu mentioned when I search up topics about YJ suspension. Was there a reason you picked Dayton leaf springs over Old Man Emu?
 
Thanks for the info. I’ve seen a lot of Old Man emu mentioned when I search up topics about YJ suspension. Was there a reason you picked Dayton leaf springs over Old Man Emu?

A lot of the Old Man Emu info you'll see around here was by me. That is what I had installed for several years as an attempt to get away from the tall lift but not quite go back to stock. It rode quite well, but ultimately I decided I wanted to go back to fully stock instead of still being lifted. So I took off the OME stuff and sold it (still have the shocks but looking to get rid of them), and then I picked up the Dayton springs and finally Bilstein stock length stocks.
 
A lot of the Old Man Emu info you'll see around here was by me. That is what I had installed for several years as an attempt to get away from the tall lift but not quite go back to stock. It rode quite well, but ultimately I decided I wanted to go back to fully stock instead of still being lifted. So I took off the OME stuff and sold it (still have the shocks but looking to get rid of them), and then I picked up the Dayton springs and finally Bilstein stock length stocks.

Would I be able to use your OME shocks on Dayton Springs?
 
Would I be able to use your OME shocks on Dayton Springs?

Yeah, they would work. I think @TRevs might have already claimed them, or at least asked about them a month or so ago. They just came off a week ago and I haven’t had time to get around to taking pics and stuff to officially put them out for anyone to buy yet.
 
Yeah, they would work. I think @TRevs might have already claimed them, or at least asked about them a month or so ago. They just came off a week ago and I haven’t had time to get around to taking pics and stuff to officially put them out for anyone to buy yet.

All good. I can look for some online. I know I want to bring my YJ down some, but have no clue where to start. All I know is that my current ride quality is alarmingly bouncy. I’m questioning the quality of my suspension. Currently I’m between buying an OME 2” suspension kit that seems to have everything I need, or follow your route and go with Dayton Springs and back to stock height. If I go the Dayton route, do I need to look into a suspension kit as well? What else would I need to look into in order to properly install them and get everything working seamlessly. I have a friend that does a lot of work on cars/trucks that’s willing to teach me how to do stuff like this, but I’m hoping to get all the parts together so we can do this over a weekend. Even if I don’t truly need a full suspension, it will be worth learning more about my YJ and how to work on it.
Thanks so much for your advice!

Most lifts will be pretty bouncy due to the arched springs. OME is the only option I’ve found for staying with any lift that seems to have any bit of comfort. It felt great for what it was.

I went with stock because it was easier to make things “right.” Driveshaft angles, steering angles, etc. Putting it back to OEM level takes out most of the fitment variables and makes it predictable. It was easy to come to that decision when I eventually forced myself to answer if the larger tires were benefiting me at all. The answer was, they weren’t. So instead of more half measures, I went all the way back to stock.

No, you wouldn’t need a “kit” to return to stock. The only reason lifts are considered a kit to begin with is because you need supplemental parts to assist making all the changes to deal with the new suspension geometry. If you go back to stock then you would just return anything previously changed, back to stock. If you went to OME, then, you might end up keeping some of the supplemental lift parts depending on what they are. It all depends on what all the previous owner used when they lifted.

You’ll figure it out in time. Lots of good resources like the factory service manuals, parts manuals, and lots of other forums out there and YouTube videos.
 
  • Like
Reactions: SquareFace
I’m still interested! 🙂

@machoheadgames . After your conversion back to stock suspension, what is your honest opinion on ride quality on roads? Was it smoother with OME? I’m sure your handling is much better now, but what about overall comfort? Do you miss anything about your old suspension? Anything with your new stock suspension that made it noticeably better? Do you wish you chose any different components with your stock suspension? I completely understand your reasoning to go back to stock, and am leaning towards that route as I don’t have much knowledge or free time to make frequent adjustments.
 
@machoheadgames . After your conversion back to stock suspension, what is your honest opinion on ride quality on roads? Was it smoother with OME? I’m sure your handling is much better now, but what about overall comfort? Do you miss anything about your old suspension? Anything with your new stock suspension that made it noticeably better? Do you wish you chose any different components with your stock suspension? I completely understand your reasoning to go back to stock, and am leaning towards that route as I don’t have much knowledge or free time to make frequent adjustments.

On springs like OME and stock, I think the ride quality really comes down to the shock more than the spring. When you are on a tall lift, then the spring pretty much doesn't flex well and makes the ride pretty stiff no matter what shock you have. That has been my experience with the taller lifts anyways.

I didn't drive OME enough to really have an opinion on it. I would say that from what I did experience, it was probably about as soft as the stock springs. I would consider the two about equal, and decide which to go based on whether or not you want lift.
 
  • Like
Reactions: SquareFace
I gave up on the Borla. No matter what I did, I could not get it to stop interfering with the frame when it was warmed up and expanded.

I reached out to Napa accessories for a return, they of course told me that I couldn’t return it because it had been installed. Stupid policies - the thing still looked new. Anyways, the customer service rep did tell me I could do an exchange, which I ignored. A few days later, a random shipping label came in with very generic wording along the lines of “please ship your item back for refund/exchange”….so we’ll see what happens. The label is sending it back to Borla, not Napa. I tried to pack it as close to brand new as possible, so hopefully they just tell Napa to give me a refund.

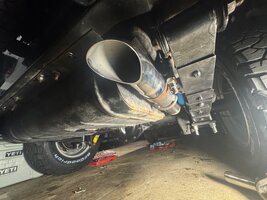
In the meantime, I decided to try another exhaust, based on a recommendation from one of my YJ buddies. He told me how much he likes his Banks exhaust, and the price was not too bad so I decided to buy one. Overall, Banks fit much better than the Borla. It took me a bit to get it all installed, but I was able to get it all installed without touching, and the areas that used to be problem points are not any longer.

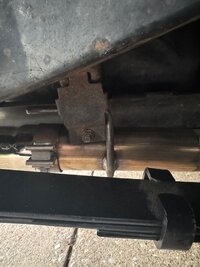
There is one snag….after driving and warming up, now the rear hanger hits. It did not hit when I did the dry install, but it hit after driving quite a bit.

IMG_1417.jpeg

Nothing else hit though, and this interference didn’t even make any noise. Most likely I am going to remove the tailpipe, have a shop reweld that hanger about an inch forward, and call it done. Other than that the kit fits perfectly. The icing on the cake? It sounds good and not obnoxious. So it still solves the noise problem and fits better than the Borla. And actually has a much less obnoxious tip too. So hopefully I get my Borla money back, can get the Banks tweaked, and put the exhaust behind me.

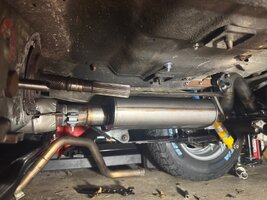
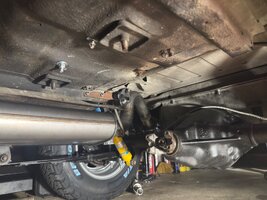
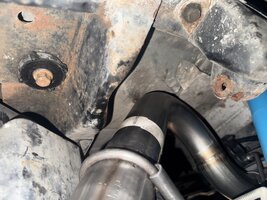
Here are some photos of the Banks installed:

IMG_1259.jpeg

IMG_1260.jpeg

IMG_1258.jpeg

IMG_1250.jpeg
 
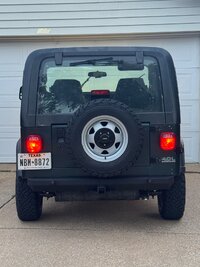
Not really much to say on this one, but I decided to utilize a Smittybilt rear bumper. Removing the ARB bumper revealed some drilled holes (unevenly spaced) and some painting I did to make the holes not rust. Essentially, eyesores were exposed and I’m not really a fan.

While I love the bumperettes, this bumper offers some benefits anyways, including a tow rated hitch, shackle points, looks decent with no obnoxious branding, and it covers up the crossmember holes.

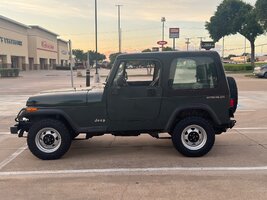
It’s a simple classic looking bumper and while I’m no smitty fan, this one actually works for me.

IMG_1419.jpeg

While I was driving around this evening, I stopped in a parking lot just for a wellness check to make sure no leaks. I grabbed this pic which also kinda shows a side profile of the bumper. Overall it looks proportional and not obnoxious at all.

IMG_1416.jpeg
 
The t-case troubles continue, and I’m not really sure why or what the actual problem is at the moment. As a reminder, the issue previously was I had a squealing bearing sound anytime the vehicle was rolling, especially at road speed. It seemed I was not getting adequate fluid to the tail housing, so I removed the tail housing and extension and I found silicone sitting in the little access window that fluid travels through to get to the tail housing.

The tail shaft bearing seemed bad, so I got a new one, as well as a new slip yoke bushing. I even picked up the handy dandy factory driver tools for the extension bushing removal and install, which made that job a breeze.

IMG_1351.jpeg


I needed to change the shift sector plate anyways, because I wanted a true neutral version from a TJ. I already owned the correct sector, just needed to swap it in. I didn’t use it last time I built this t-case because I was intending on keeping the CAD at that point. Anyways, removed the t-case, swapped the sector, put everything back together, and made sure to not overdo the tail housing RTV.

This afternoon, I finally had the t-case all back in and buttoned up, and I ran the Jeep in gear on jack stands with the speedo gear removed to observe fluid. The tail housing filled up with fluid pretty quickly, so I figured I’m good for the road now.

For whatever reason, I am still hearing noise. It is the same noise, although it sounds slightly better. So it’s like I have pinpointed the problem, but I just can’t figure out why that area is still causing me trouble.

It’s just a hunch but I sort of wonder if the aftermarket extension cone is maybe poorly made and slightly has the bushing off center from the slip yoke? And maybe the noise I’m hearing is the slip yoke interfering with the bushing? I really don’t know.

I ended up picking up a third (crazy, I know) t-case out of a 1995 this time, so I could experiment. Being a 95 and the newest of all the t-case parts I own, it used a few different parts than I am used to. So I bought a rebuild kit for it, I am going to only use the few minimal parts I need from the old t-case, and then I’m going to build it and see if this problem goes away. I will be using the 95 tailbone.

I don’t really know what else the issue could be. I’m getting fluid. Everything drives good, but you hear that noise and it is just incessant. I really thought I was in the clear once I saw the scored bushing and loose tail bearing. Figured replacing those would surely solve the problem, assuming I didn’t have an oiling problem, which I have confirmed I don’t.

So I’m not in the clear yet, but I am making progress. I actually bought the t-case last Friday, but I’m still waiting on the rebuild kit, so I’m kind of just stuck.

Assuming all goes well with the 95 case, I am going to reinstall the SYE parts I have lying around into my old 94/89 mound of tcase parts, and I’ll sell what I can. I’m a damn expert at building t-cases now, so I at least know I can get the 95 case working perfectly. I just hope this finally gets rid of the noise.
 
  • Like
Reactions: ytradio
I gave up on the Borla. No matter what I did, I could not get it to stop interfering with the frame when it was warmed up and expanded.

I reached out to Napa accessories for a return, they of course told me that I couldn’t return it because it had been installed. Stupid policies - the thing still looked new. Anyways, the customer service rep did tell me I could do an exchange, which I ignored. A few days later, a random shipping label came in with very generic wording along the lines of “please ship your item back for refund/exchange”….so we’ll see what happens. The label is sending it back to Borla, not Napa. I tried to pack it as close to brand new as possible, so hopefully they just tell Napa to give me a refund.

In the meantime, I decided to try another exhaust, based on a recommendation from one of my YJ buddies. He told me how much he likes his Banks exhaust, and the price was not too bad so I decided to buy one. Overall, Banks fit much better than the Borla. It took me a bit to get it all installed, but I was able to get it all installed without touching, and the areas that used to be problem points are not any longer.

There is one snag….after driving and warming up, now the rear hanger hits. It did not hit when I did the dry install, but it hit after driving quite a bit.

View attachment 123978

Nothing else hit though, and this interference didn’t even make any noise. Most likely I am going to remove the tailpipe, have a shop reweld that hanger about an inch forward, and call it done. Other than that the kit fits perfectly. The icing on the cake? It sounds good and not obnoxious. So it still solves the noise problem and fits better than the Borla. And actually has a much less obnoxious tip too. So hopefully I get my Borla money back, can get the Banks tweaked, and put the exhaust behind me.

Here are some photos of the Banks installed:

View attachment 123979

View attachment 123980

View attachment 123981

View attachment 123982

Good news, I received a full refund on the Borla exhaust, so now it's as if I never spent any money on it. That makes paying for the Banks a lot less painful.

Now to figure out what I need to do to make the Banks hanger not rub. Probably slide the cat just a tiny bit further forward, once I feel like taking it apart again.
 
  • Like
Reactions: Plastic Fury
Novak Conversions Jeep Wrangler YJ radiators