Help with windshield frame hinges

So will you also be replacing the windshield/body foam gasket between the hinges? Mine is dry rotted and I'm seeing various reviews about some not fitting. Anyone with recommendations?
Once I get to that stage I'll probably replace it as it comes with the setup I plan on getting:
But if there are any issues I'd probably reuse the gasket from my original frame since it's still in fair condition.
 
  • Like
Reactions: Flyer58
So will you also be replacing the windshield/body foam gasket between the hinges? Mine is dry rotted and I'm seeing various reviews about some not fitting. Anyone with recommendations?
Here's one I found from Extreme Terrain with some good reviews:
 
  • Like
Reactions: Flyer58
So another update for anyone curious. Picked up one of these from Amazon:
Didn’t have any MAPP gas so used propane instead. 30 seconds of flame on that one bolt, a minute to cool, impact wrench and Boo Ya Kah Sha! All the advice about using heat was spot on. So now, for the first time in the 28 years I had my Jeep, that windshield folded like a bad poker hand.

So next step is removing the windshield wiper motor and VIN plate. Found a pretty good video on YouTube:

I’m creeping along. Slow is smooth and smooth is fast. I seriously appreciate all the advice.

AFAD23BD-0D6B-4200-AC9A-B787550BD76E.jpeg


E43356F0-B3E5-4028-BAFB-683103BF8C6C.jpeg


48D1CCDF-A483-4844-AAB4-759A6FA07CAB.jpeg
 

Nothing to deal with like the lower side of the hinges…

Sorry to hijack the thread, but I need to get the lower bolts off to remove some rusty POS mirrors. I got the passenger side off and heard the nuts fall out as I removed the bolts. I figured they were rivnuts/nutserts that broke off, but there were two OEM-looking 1/2” nuts with integrated washers sitting on the passenger floor mat. It took two people and was a pain in the neck (literally) but I got them re-engaged and torqued.

The problem is the driver side, where there is no access due to parking brake bracket and wiring.

I suppose I need to remove the dash to get to those nuts?
IMG_2210.jpeg
IMG_2212.jpeg

IMG_2211.jpeg
 
Sorry to hijack the thread, but I need to get the lower bolts off to remove some rusty POS mirrors. I got the passenger side off and heard the nuts fall out as I removed the bolts. I figured they were rivnuts/nutserts that broke off, but there were two OEM-looking 1/2” nuts with integrated washers sitting on the passenger floor mat. It took two people and was a pain in the neck (literally) but I got them re-engaged and torqued.

The problem is the driver side, where there is no access due to parking brake bracket and wiring.

I suppose I need to remove the dash to get to those nuts?
View attachment 122577View attachment 122578
View attachment 122579
Yep. They are just 1/2" nuts that are loosely held there with body goo (seam sealer) and are a pain to get at. The dash coming out makes it much easier. This video helped me:
 
  • Like
Reactions: TRevs
That’s what I figured. I just had the dash apart recently; at least it’s fresh in my mind, and I don’t have to remove it completely anyway.
 
Last edited:
Sorry, I missed the part above that they are loose nuts inside so I will look for them and watch that video.

Hi, I just bought this jeep plan on doing a ton of needed things to it to make it more of what I want. I had to remove the torx from the front of the windshield and was surprised how just some pb blaster soaking for a few hours then my cheap ryobi impact worked perfect and they removed easily. They were rusted in and I didn't expect that result. Anyways since I had to take them right out and the ones on the bottom door hinge too I noticed later that the plates all dropped inside the window frame and the door so there is no where to put the original bolts back into at this time lol. This is my fifth jeep so I am use to stuff like this but If I cant find the flat adjuster plates inside the doors and upper dash I am thinking revnuts lightly crushed so they can still adjust maybe. At least I sold the top and bought some new rubber so far. Anyways, PB Blaster and a light hammering with an impact is my go to.
 
Again, thanks all. Now I have a shopping list to work with:
-Impact Wrench
-PB Blaster
-Mapp Gas
-Anti-Seize
-Patience :rolleyes:

@Pman, when you say "carefully placed heat", please specify. Wouldn't it be as simple as direct heat to the individual bolts or is there a better or more efficient spot, and usually how long do you guys heat the bolts.
Heat the screws with a map gas torch, then the tool Flyer58 posted... put that in there and knock the shit out of it! This is nothing to F# around with or you'll be drilling out screws.... heat em up & nail em! and wear the good mechanics gloves with rubber padding on all the knuckles.
 
Sorry, I missed the part above that they are loose nuts inside so I will look for them and watch that video.

Hi, I just bought this jeep plan on doing a ton of needed things to it to make it more of what I want. I had to remove the torx from the front of the windshield and was surprised how just some pb blaster soaking for a few hours then my cheap ryobi impact worked perfect and they removed easily. They were rusted in and I didn't expect that result. Anyways since I had to take them right out and the ones on the bottom door hinge too I noticed later that the plates all dropped inside the window frame and the door so there is no where to put the original bolts back into at this time lol. This is my fifth jeep so I am use to stuff like this but If I cant find the flat adjuster plates inside the doors and upper dash I am thinking revnuts lightly crushed so they can still adjust maybe. At least I sold the top and bought some new rubber so far. Anyways, PB Blaster and a light hammering with an impact is my go to.
The plates are only in the windshield frame and in the door shells. They are plate steel pieces that are held in place by some sheet metal capture channel. They can't fall far. I use a pick and work them up enough to get a bolt started. The bolts on the tub side of the windshield and door are standard nuts. If they are held in place, it's only by seam sealer. You'll have to chisel that away and get a wrench on them.
 
I was able to easily reach up from below with a 1/2 wrench and get on those nuts on both sides. Even the driver's side. If you don't have speakers you can see the nuts from there. I mean some stuff is in the way like what you mentioned but certainly not to the level of needing to remove the dash.
 
I was able to easily reach up from below with a 1/2 wrench and get on those nuts on both sides. Even the driver's side. If you don't have speakers you can see the nuts from there. I mean some stuff is in the way like what you mentioned but certainly not to the level of needing to remove the dash.

The speaker magnet on the passenger side kept grabbing my wrench but i eventually got them threaded; the driver side looks impossible unless you have big hole in the dash where a speaker used to be.
 
  • Like
Reactions: DOWNS
The plates are only in the windshield frame and in the door shells. They are plate steel pieces that are held in place by some sheet metal capture channel. They can't fall far. I use a pick and work them up enough to get a bolt started. The bolts on the tub side of the windshield and door are standard nuts. If they are held in place, it's only by seam sealer. You'll have to chisel that away and get a wrench on them.
Ok, Ill check the door again but looking in the hole they are not there so someone might have already modified them. Like I took a sharp chisel and rammed it between the frame and the body to apply pressure to remove the old ones and thinking they would stay in place like all my jeeps in the past I didn't think they would drop down. Someone probably had them out before. I am going to replace the speakers in the front so will have to take it apart then. I was thinksing of doing a mod I saw to replace the 4 inch speakers in the roll bar with some hed cerwin vega 6.5 I have in my garage new in the box and was thinking of putting in some hed 4x6 behind the grates too if they fit the magnets so I can fix it then.. If I have to and there is room Ill either tac some nuts under there with my mig welder or use rivnuts ( I always like buying a new tool ;) 
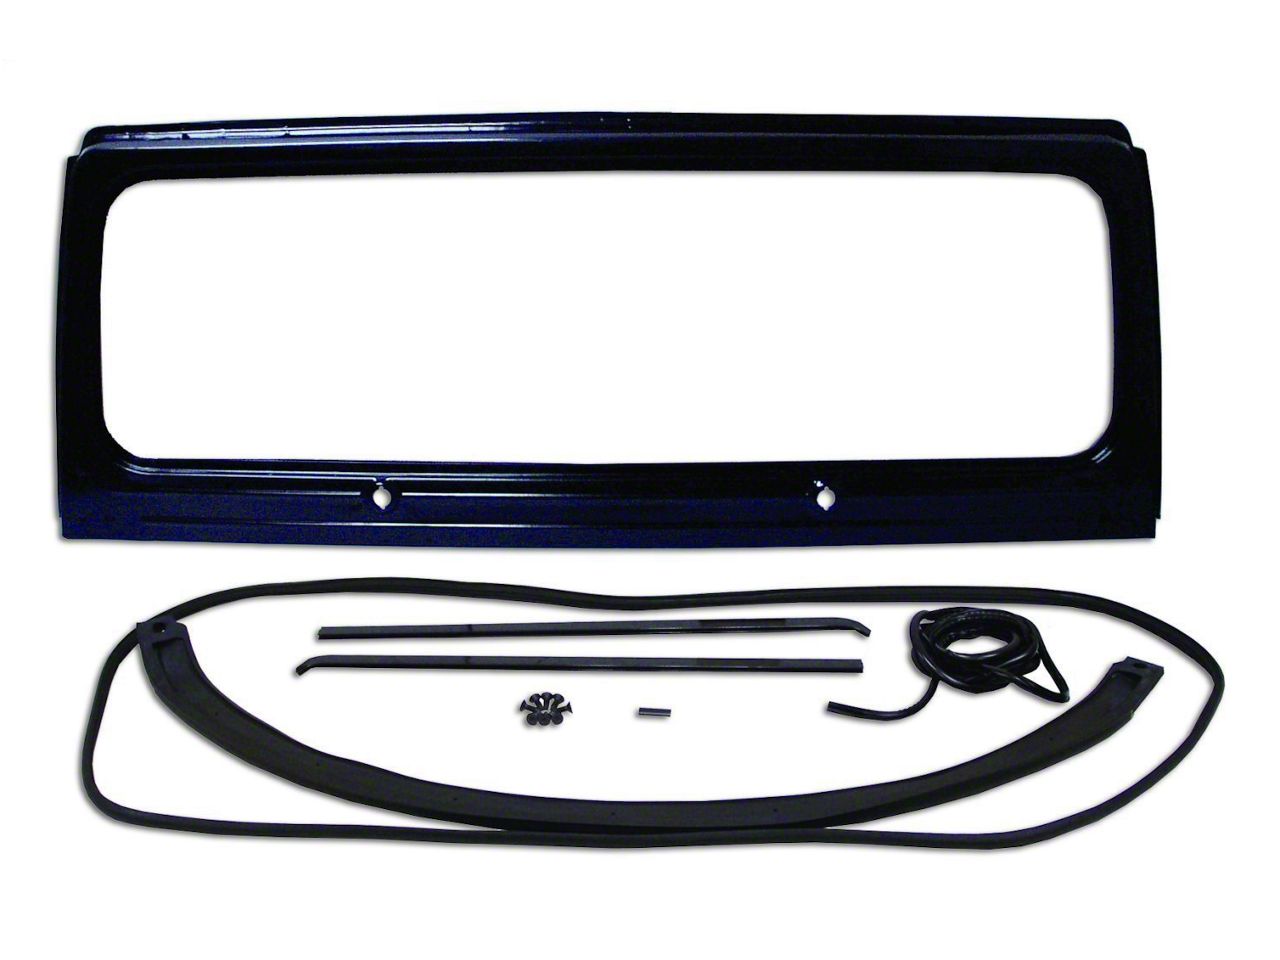
) If the one in the door is like you said and still there that would be awesome so I will check that this morning. Thanks for the clarification on which are plates and which are nuts glued to the inside. Silly jeep designers lol
 
I'll put this here since it's on topic.

I installed a new lower windshield cowl gasket yesterday and and have a few tips and found a few hidden treasures.

While trying to remove the 10 Torx screws from the roll bar and lower flat plate I had five give a loud pop as they broke loose (not broke off) and then very difficult to turn. The other five were frozen solid and didn't budge.

For 20 years now I've been a big fan of Aero Kroil penetrating oil for removing stuck or rusted hardware. It creep in and doesn't dry out like PB does. Just a few drops, no need to hose it down. I sprayed each Torx screw and let it set overnight. The next day, the five that popped loose turned very easily and the other five came loose with minimal effort. The Kroil is expensive but one can lasts years.

The original cowl seal was way past it's prime and crumbled in my hands. Lots of sand in and around the windshield frame and also a few hidden items.

The new seal fit well and I'll finish tightening up eveything today.

1709825960490.png
1709825997073.png

1709826026115.png
1709826044760.png

1709826067251.png
 
  • Like
Reactions: DOWNS
The speaker magnet on the passenger side kept grabbing my wrench but i eventually got them threaded; the driver side looks impossible unless you have big hole in the dash where a speaker used to be.

Nope not impossible. I mean, the thought of removing the dash never even crossed my mind. The hardest part was trying to do that and work the ratchet on the outside at the same time, because I never have any help around here, lol.
 
One more comment. I found if you keep the 10 Torx screws loose, properly fit the hard top into position, then tighten the screws, it's makes life a whole lot easier than trying to squeeze the hard top gaskets and corners into place. Good tight fit now.
 
  • Like
Reactions: DOWNS and ACKyj
Nope not impossible. I mean, the thought of removing the dash never even crossed my mind. The hardest part was trying to do that and work the ratchet on the outside at the same time, because I never have any help around here, lol.

I was able to get fairly good access to those driver side bolts by removing the speedometer. Didn’t have to remove the dash although the speaker magnet grabbed the wrench a dozen times and the nuts half that.

IMG_2415.jpeg
 
The speaker magnets were pains for me as well. I unbolted my dash and shifted it around during the procedure since i was restoring the Jeep as well.

And agree with using Kroil. The can I have is probably 15 years old. A little goes a long way, especially when using a bit of heat at the time of removal.
 
  • Like
Reactions: Flyer58
Sorry to hijack the thread, but I need to get the lower bolts off to remove some rusty POS mirrors. I got the passenger side off and heard the nuts fall out as I removed the bolts. I figured they were rivnuts/nutserts that broke off, but there were two OEM-looking 1/2” nuts with integrated washers sitting on the passenger floor mat. It took two people and was a pain in the neck (literally) but I got them re-engaged and torqued.

The problem is the driver side, where there is no access due to parking brake bracket and wiring.

I suppose I need to remove the dash to get to those nuts?
View attachment 122577View attachment 122578
View attachment 122579
No worries on the hijack. It’ll be good to know how you got to them. Lotsa good advice here.

I do have an update. So, got the new frame installed, wiper motor in correctly, and everything put back together. Only issues were three holes not lining up 😤. All on the drivers side. One on the hinge, one on the roll bar and one on the dash plate. Passenger side all lined up. Seemed solid enough so went ahead with the glass install. Don’t know if it was my install or the frame holes just off. Anyhoo I put a plug in h the outside hole on the hinge to keep water out
7DDD404D-CA8B-4F22-A25F-4456EBA5CEE5.jpeg
94C776D0-FB00-4006-AA69-407860817543.jpeg
814DFE80-1D02-4E44-BDAB-8E4543F215AB.jpeg
2D5B5EAF-A885-4567-A274-37F85FB214D0.jpeg
and am just calling it good. Regardless just glad to have her back on the road again. Maybe I’ll get a wild hair and try again to line up everything, but for now I’ll deal. Thanks again everyone!

27F6F2C3-EF84-4961-8BD1-56E3C097F6B7.jpeg


C11186F9-28CA-49EC-B261-E58D7FE43892.jpeg
 
I had a similar issue on a repop half door I purchased. The door sat WAY too far forward. Like, rubbing the tub at the hinges forward, even with the hinges moved rearward to the max on the tub side. I had to really work at elongating the holes and tweaking things to get it to shift rearward enough for the latch to grab (even with extra shims under the latch). Still has a bit of a wonky gap, but whatever. Quality has taken a nose dive really badly lately in addition to everything costing more.

There's a word to describe it that has been coined recently.

En$#!ttification.

It technically applies to online services, but imo, is applicable everywhere that the consumer gets hit by having to pay twice for something.

First, the product is good for a while and develops a good reputation, or gets good reviews.

Then, The price goes up because people will pay more for a good product.

Then, quality tanks because the manufacturer has enough positive reviews, and people's $$$$, they don't care anymore.

Then, you and me are stuck, modifying something to work that should just work in the first place. Hence, having to 'pay twice'.

Then a 'new and improved' product comes along and 'fixes' all the issues the former product had.

Repeat ad nauseam.
Glad it’s not just me. Totally agree with you on this.